All Categories
Featured
Table of Contents
- – Camper Trailer Service Near Me Orange, CA
- – OCRV Center
- – Pop Up Camper Roof Repair Orange, CA
- – Camper Repair Shops Near Me Orange, CA
- – Camper Repair And Service Orange, CA
- – Pop Up Camper Roof Replacement Orange, CA
- – Pop Up Camper Repair Near Me Orange, CA
- – Camper Repair Shops Near Me Orange, CA
- – Camping Repair Near Me Orange, CA
- – Camper Repair Near Me Orange, CA
- – Pop Up Camper Roof Repair Orange, CA
- – Pop Up Camper Roof Repair Orange, CA
- – Camper Repair Shop Orange, CA
- – OCRV Center
Camper Trailer Service Near Me Orange, CA
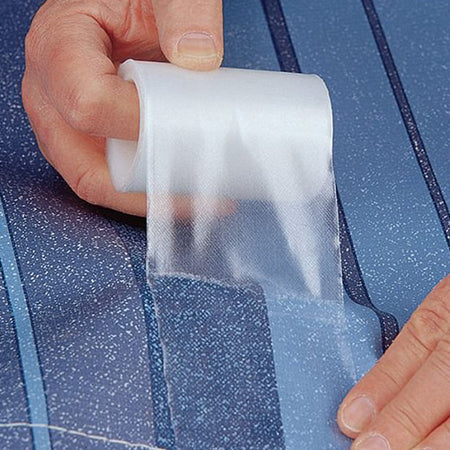
Camco's Recreational vehicle Awning Repair service Tape is an irreversible repair for holes and punctures on your Motor home awning. Use it for Motor home, boat sails, canvas, outdoors tents, rain wear, knapsacks, popup campers and even more.
This means you can concentrate on appreciating your trip with no disruptions or hold-ups! Do not let a broken trailer awning or various other camping gear ruin your journey! With this tape, you can quickly and effectively fix any tears and continue appreciating the open airs. Its dependable and durable nature makes it excellent for all kinds of weather, making certain that your repair services will certainly last.
Conserve time and money with this helpful Recreational vehicle camping crucial! QUICK & PERMANENT REPAIR WORK: No extra troubling about costly replacements or temporary fixes! Camco's Awning Repair Tape supplies a long-term fixing for holes and leaks on your camper awning.
September 18, 2019September 3, 2018 Our Dometic 9100 power awning is currently over seven years old. The awnings textile is beginning to gradually disintegrate at its top area closest to the Motor home sidewall.
Pop Up Camper Roof Repair Orange, CA
Below the awnings end grain is double stitched, and the threads are degenerating. I was afraid a major failing was in my awnings future, so determined to try a short-term patch.
The cleaner the surface area the much better the repair tape will certainly stick. I applied a strip to the underside and top of the awning along the threaded bead joint.
Camper Repair Shops Near Me Orange, CA
I went slowly a few inches at a time attempting to prevent any type of creases or bubbles. I then included a 2nd strip close to it covering most of the spots where peeling and flaking are occurring.
I recognize new substitute awning material is in my future however wish this patch will certainly postpone the need up until I can find a good offer on it. In this video clip, I upgrade you on last summers temp spot to my Dometic 9100 RV power awning.
Camper Repair And Service Orange, CA
It's best to repair your awning prior to it's permanent and you need to replace it. The nationwide average expense to repair an awning is, with most property owners nationwide paying between. Awning repair service expense will certainly differ relying on the type of fixing required, the awning component that requires dealing with, the quantity of damages, and the kind of awning.
Lots of factors can affect the last expenses for an awning repair service, but the kind of repair work you require to carry out plays one of the most significant function. The most standard and cheapest repair work entail lubricating gears and various other easy tasks. On the other hand, motor repair service or repairing the awning frameworks are extra intricate and, consequently, more costly.
Pop Up Camper Roof Replacement Orange, CA
Mean you have a retractable awning that is not pulling back or experiencing some other malfunction. Employing an electrical expert to repair your awning expenses between and the fix might be as basic as replacing a blown fuse or a brief.
When your awning is not retracting, it might be for a number of factors. The expenses to fix a motor variety from.
Pop Up Camper Repair Near Me Orange, CA
Awning frames are the backbone of your awning. Without a solid, strong frame, your awning will certainly not have the ability to perform its feature. It's very easy to neglect to retract your awning, however the framework might get damaged when it is out in the open throughout a snowstorm or strong wind.
Lateral arms can get damaged equally as promptly as the awning framework. The lateral arm is liable for moving the awning backwards and forwards, so if it's harmed, it might make your whole system pointless. If your lateral arms are bent and twisted, it's time to repair them. Whether mechanical or not, dealing with awnings' lateral arms costs.

However, it's easy to neglect that the fabric of your awning is revealed to the elements throughout the day, daily. If a storm or high winds rip the material, you'll require to get it repaired instantly. The average costs for fabric repair service are in between, however these will certainly likewise depend upon the textile product.
Gradually, you'll discover that your awning frame has come to be loosened and isn't as fixed as it was when you initially mounted it. That is usually because of weight pulling on the product and wind pushing versus it, which is entirely typical. If you wish to protect the awning prior to it drops on somebody's head, the price of having an awning reattached to your house or window arrays from.
Camper Repair Shops Near Me Orange, CA
If you have a wood awning, it might be based on stains, as it is a natural product. Removing stains in the timber could cost between. If the discolor is more extreme and there are cracks in the wood, you may require to replace some boards or perhaps the whole awning, which will increase the expenses.
Below are a few of the various other variables that can influence the last cost of an awning fixing: The issues you may experience with your awning can differ from one kind to one more, and that will affect the prices to repair them. Taken care of awnings are the most common type since they're simple to mount and do not need unique devices or abilities.
The expense to repair a fixed awning arrays from, and it normally includes taking care of brackets and covering the textile. Hand-operated awnings are great for those that want a little bit more control over their outdoor area. They are by hand operated and can be expanded to give an added layer of insurance coverage.
The expenses to repair a hands-on retractable awning range in between. Motorized awnings are more costly to fix due to the fact that they use electric electric motors to make them open and close.
Camping Repair Near Me Orange, CA
The cords are an important element of an awning's system, as they reel the awning in and out. If the cord ends up being damaged, it can impede the awning's capacity to retract.
Generally, they're reasonably affordable, so you can change them for. The arm is the part of the awning that gives assistance, and it's usually made of metal. It can damage or fall off over time, depending on just how well it was developed and exactly how typically you utilize your awning.
Camper Repair Near Me Orange, CA
The worm equipment is part of the system that helps retract a hand-operated awning. If there is an issue with your awnings' worm equipment, you won't be able to open and shut the awning and keep it folded when it rains. The expenses for a worm equipment substitute variety in between An awning can be a wonderful enhancement, not only to your home but to your motor home, also.
Aluminum awnings are lovely, suit various other metal components of your home, and are super very easy to clean. And when they do, the ideal method to repair these awnings is by replacing individual strips.
The prices to change an awning framework variety from. The expenses will differ depending on the awning material: plastic awnings are the most pricey, and cotton canvas is the cheapest.
Pop Up Camper Roof Repair Orange, CA
The dimension of these awnings differs depending on their area, so the repair work expense will certainly differ appropriately - Camper Trailer Repair Orange. Home window or Door$200 $400Deck, Deck, or Patio area$300 $800 For instance, expect you intend to repair an awning positioned on your window or door. Because case, you will need to pay regarding for the materials and labor associated with this procedure due to the fact that the area is little enough to be taken care of without much difficulty or cost
You need to anticipate to pay regarding for this repair work work, as the awning will certainly be bigger. Some professionals will charge you for the number of hours invested repairing your awning.

Depending on their design, they can be utilized to shade your house from the sunlight and obstruct out rainfall. You can pay for a prefabricated set awning or up to for a motorized deck awning.
Pop Up Camper Roof Repair Orange, CA
However, RV awnings are more subjected to weather and susceptible to wear and tear than the ordinary home awning. The prices to change a recreational vehicle awning array in between, and the much more complicated the awning, the costlier it will be. If the last storm was harsh on your home, leaving your awning damaged, you could likewise question exactly how much it sets you back to repair your roofing system.
Fixing the roofing system could consist of removing ice dams, changing shingles, re-tiling, changing seamless gutters, or fixing harmed siding, smokeshafts, fascias, and a lot more roofing parts. It sets you back about generally, with the majority of home owners paying in between. If your awning is starting to reveal its age, and you wish to repair it yourself, purchasing a canvas fixing set is the most convenient and most affordable way to do it.
Canvas fixing kit$15 $75Canvas tape$10 $20 The expenses to fix the material in your awning array from (Camper Trailer Repair Orange). Nonetheless, the ideal means to stay clear of troubles with your awning is to ensure it's properly maintained and evaluated when annually. That will certainly ensure any kind of problems are captured prior to they end up being as well huge to handle by yourself
Camper Repair Shop Orange, CA
Similar to any kind of solution, labor prices are likely greater than in country areas if you're in a city. On top of that, if you reside in a location with severe winters, you might need to enhance your awning to stand up to these weather condition conditions, which can cost even more. You won't recognize exactly how much awning fixing expenses in your location till you get to out to some neighborhood pros for price estimates.
You can additionally acquire winter season covers to secure it from snow storms. If you have a mobile awning, remove it from your yard and shop it safely. The price of awning fixing can differ extensively depending on the extent of the damage and the kind of repair needed. The majority of house owners nationwide pay between.
Rv Camper Ac Repair Orange, CACamper Services Orange, CA
Pop Up Camper Canvas Repair Orange, CA
Camper Services Orange, CA
Rv Camper Repair Orange, CA
Camping Repair Near Me Orange, CA
Camper Repair Shop Orange, CA
Camper Repair Places Near Me Orange, CA
Camper Repair Orange, CA
Camper Services Orange, CA
Pop Up Camper Roof Repair Orange, CA
Camper Service Near Me Orange, CA
Camping Repair Near Me Orange, CA
Camper Service And Repair Orange, CA
Camper Repair And Service Orange, CA
Camper Trailer Repair Near Me Orange, CA
Camper Awning Replacement Orange, CA
Pop Up Camper Repair Near Me Orange, CA
Camper Roof Repair Near Me Orange, CA
Camper Awning Repair Orange, CA
Rv Camper Repair Orange, CA
Camper Repair Orange, CA
Rv Camper Ac Repair Orange, CA
Rv Camper Repair Near Me Orange, CA
Camper Air Conditioner Repair Near Me Orange, CA
Camper Awning Replacement Orange, CA
Camper Trailer Repair Near Me Orange, CA
Camper Repair Shop Orange, CA
Camper Trailer Repair Orange, CA
Camper Services Orange, CA
Rv Camper Repair Near Me Orange, CA
Camper Repair Near Me Orange, CA
Camper Trailer Repair Near Me Orange, CA
Camper Service Near Me Orange, CA
Camper Service Center Orange, CA
Rv Camper Repair Near Me Orange, CA
Camper Service Center Orange, CA
Camper Awning Replacement Orange, CA
Camper Roof Replacement Orange, CA
Camper Service Orange, CA
Camper Roof Repair Near Me Orange, CA
Camper Service And Repair Orange, CA
Camper Service Center Orange, CA
Camper Roof Replacement Orange, CA
Camper Trailer Repair Near Me Orange, CA
Camper Trailer Repair Orange, CA
Camper Repair Shop Near Me Orange, CA
Camper Service Center Orange, CA
Rv Camper Ac Repair Orange, CA
Camper Service Near Me Orange, CA
Rv Camper Repair Orange, CA
Camper Service And Repair Orange, CA
Camper Trailer Repair Near Me Orange, CA
Rv Camper Repair Near Me Orange, CA
Camper Repair And Service Orange, CA
Camper Repair Near Me Orange, CA
Camper Service And Repair Orange, CA
Camper Trailer Service Near Me Orange, CA
Camper Roof Replacement Orange, CA
Camping Repair Near Me Orange, CA
Camper Awning Replacement Orange, CA
Camper Service Near Me Orange, CA
Rv Camper Ac Repair Orange, CA
Camper Repair And Service Orange, CA
Camper Repair Near Me Orange, CA
Camper Trailer Service Near Me Orange, CA
Camper Repair Shop Orange, CA
Camper Service Center Orange, CA
Camper Service Orange, CA
Camper Repair And Service Orange, CA
Camper Air Conditioner Repair Near Me Orange, CA
Camper Repair Places Near Me Orange, CA
Pop Up Camper Roof Repair Orange, CA
Camper Awning Repair Orange, CA
Camper Repair Orange, CA
Camper Trailer Service Near Me Orange, CA
Camper Repair Shops Near Me Orange, CA
Rv Camper Repair Orange, CA
Find Seo Company Near Me Orange, CA
Finding A Good Seo Optimization Services Orange, CA
Camper Trailer Repair [:city], [:state]
OCRV Center
Table of Contents
- – Camper Trailer Service Near Me Orange, CA
- – OCRV Center
- – Pop Up Camper Roof Repair Orange, CA
- – Camper Repair Shops Near Me Orange, CA
- – Camper Repair And Service Orange, CA
- – Pop Up Camper Roof Replacement Orange, CA
- – Pop Up Camper Repair Near Me Orange, CA
- – Camper Repair Shops Near Me Orange, CA
- – Camping Repair Near Me Orange, CA
- – Camper Repair Near Me Orange, CA
- – Pop Up Camper Roof Repair Orange, CA
- – Pop Up Camper Roof Repair Orange, CA
- – Camper Repair Shop Orange, CA
- – OCRV Center
Latest Posts
Fleet Maintenance Pomona
Van Repair Shop Near Me Norco
Rv Roof Leak Repair La Habra
More
Latest Posts
Fleet Maintenance Pomona
Van Repair Shop Near Me Norco
Rv Roof Leak Repair La Habra