All Categories
Featured
Table of Contents
- – Rubber Roof For Camper Silverado, CA
- – OCRV Center
- – Rv Trailer Rubber Roof Repair Silverado, CA
- – Rv Fiberglass Roof Repair Silverado, CA
- – Rv Rubber Roof Maintenance Silverado, CA
- – Rubber Roofing For Rv Silverado, CA
- – Rv Rubber Roof Replacement Silverado, CA
- – Rv Fiberglass Roof Repair Silverado, CA
- – Motorhome Roof Replacement Silverado, CA
- – Rv Slide Out Roof Repair Silverado, CA
- – Rubber Roof For Camper Silverado, CA
- – Rv Roof Repair Near Me Silverado, CA
- – Rv Roof Repair Service Near Me Silverado, CA
- – Rv Fiberglass Roof Repair Silverado, CA
- – OCRV Center
Rubber Roof For Camper Silverado, CA
Wipe it completely dry and then enable the surface area to completely dry in the sunlight prior to applying the tape per the guidelines. When you apply the tape, make certain to push each piece down completely, eliminating any kind of air bubbles and forcing the tape down all the method to the surface in any type of reduced places.
The life expectancy of motor home roof coverings varies widely relying on quality, material, and the degree of upkeep they have actually received. 10 to twenty years is a sensible estimate for the whole life expectancy of a roofing. If you believe you could need a new roofing system, I suggest obtaining it checked and valued by a specialist prior to attempting to address massive leaks by yourself.
Rv Trailer Rubber Roof Repair Silverado, CA
And then all of your time, effort, and prices could be wasted if it's time for a new roof covering. Roofing system leakages are one of the terrific usual of Recreational vehicle life.
In that instance, you might want to take a look at these related guides: Our solutions to frequently asked questions about fixing Recreational vehicle roofing leaks: Don't put things off. Leaks just obtain worse and a lot more pricey to take care of over time.
are thought about by many to be the best product for most applications. There are comparable products offered. It relies on the sealer you make use of. A lot of items are created to treat the fastest around "area temperature," which is usually around 60 or 70 levels. Inspect the guidelines on the sealant of your option to verify.
Rv Fiberglass Roof Repair Silverado, CA
Some RVers like them, while others discourage them. I've used Flex Seal products for quick, temporary repair services to our recreational vehicle's walls, and they worked well. My only issue is that they are tough to remove. It depends upon your plan terms and what triggered the roof leakage. If the leak was caused by a sudden and unexpected event, such as a tree arm or leg dropping throughout a storm, I would certainly expect that the majority of insurance coverage would cover it.
Below are some photos of a project I did to repair roof covering rot on my fifth wheel camper. I chose to use this technique due to the fact that I could do it myself with my own resources and abilities. Or else, a great deal of equipment, consisting of the ladder and roof shelf, the endcap and the filon external wall surface would have had to be abused.
I utilized items from The Rot Physician. They were very handy in discussing my alternatives and in describing the methods to used their products.

Brian N. 1. I used a box knife to cut the rubber roof in the edge. The leakage was simply above the pencil where the trim molding meets the end-cap. It possibly leaked from the moment the device was brand-new, as the roof was very soft in this edge, and we've remained in drought problems for two years.
Rv Rubber Roof Maintenance Silverado, CA
Folding back the rubber exposed the rotten location. I cut an item of plywood like a puzzle to match the form of the hole I made in the roof.
Absolutely nothing fancy below. 4. Here's the sprayer I made use of to apply the CPES * from The Rot Physician. With its 18 metal "stick" I might probe right into the 2 space between the roofing and the ceiling. I likewise placed the wand down right into deep space between the wall and the external filon to saturate the structural participants with CPES *.
Right here's the finished roof secured up with Eternabond tape. I ran a strip of Eternabond all the way across the camper where the roof satisfies the endcap. I additionally had rot in the wall surface straight below the location on the roof.
Below I have actually removed the wall material and damp insulation to disclose the area impacted. 8. I completely dried the location for several days making use of the exhaust side of a tiny hoover, placing the hose between the inner and external walls. When it was extensively completely dry I coated every little thing with CPES *, using the pest sprayer to penetrate right into otherwise inaccessible areas.
Rubber Roofing For Rv Silverado, CA
Keep in mind the leading 3-4 of the stud was completely deteriorated away. I spread out Fill-It Epoxy Filler * throughout the location. The things goes on like a thick and sticky gel, then dries out to a really hard material that bonds to the CPES * I had actually splashed onto the wood.
Below's the finished product. Feel totally free to contact us if you require support with which products to use.
In this guide, we'll check out the prices, advantages, and choices for sealing and fixing your recreational vehicle roof covering, aiding you make the finest decision for your vehicle. While some indicators that your RV roof covering is damaged or leaky are noticeable, such as water streaming in throughout a rainstorm, other indicators of damage may not be as conveniently evident.
Rv Rubber Roof Replacement Silverado, CA
If the architectural stability is still sound, sealing and strengthening it with Liquid Rubber products may be the smarter, a lot more cost-efficient service. As soon as you recognize your RV's roofing kind, you must think about the expense of changing it. The expense will differ relying on the size of the recreational vehicle, the kind of roof covering, and the materials utilized.
Along with the price of the products, ought to additionally be thought about. If you pick to work with a for the task, after that you can anticipate to pay anywhere from for labor, relying on the dimension of the RV, the kind of roofing system and the complexity of the task. If you choose to do the task on your own, you can anticipate to pay just for the products and the financial investment of your do it yourself sweat equity.
Rv Fiberglass Roof Repair Silverado, CA
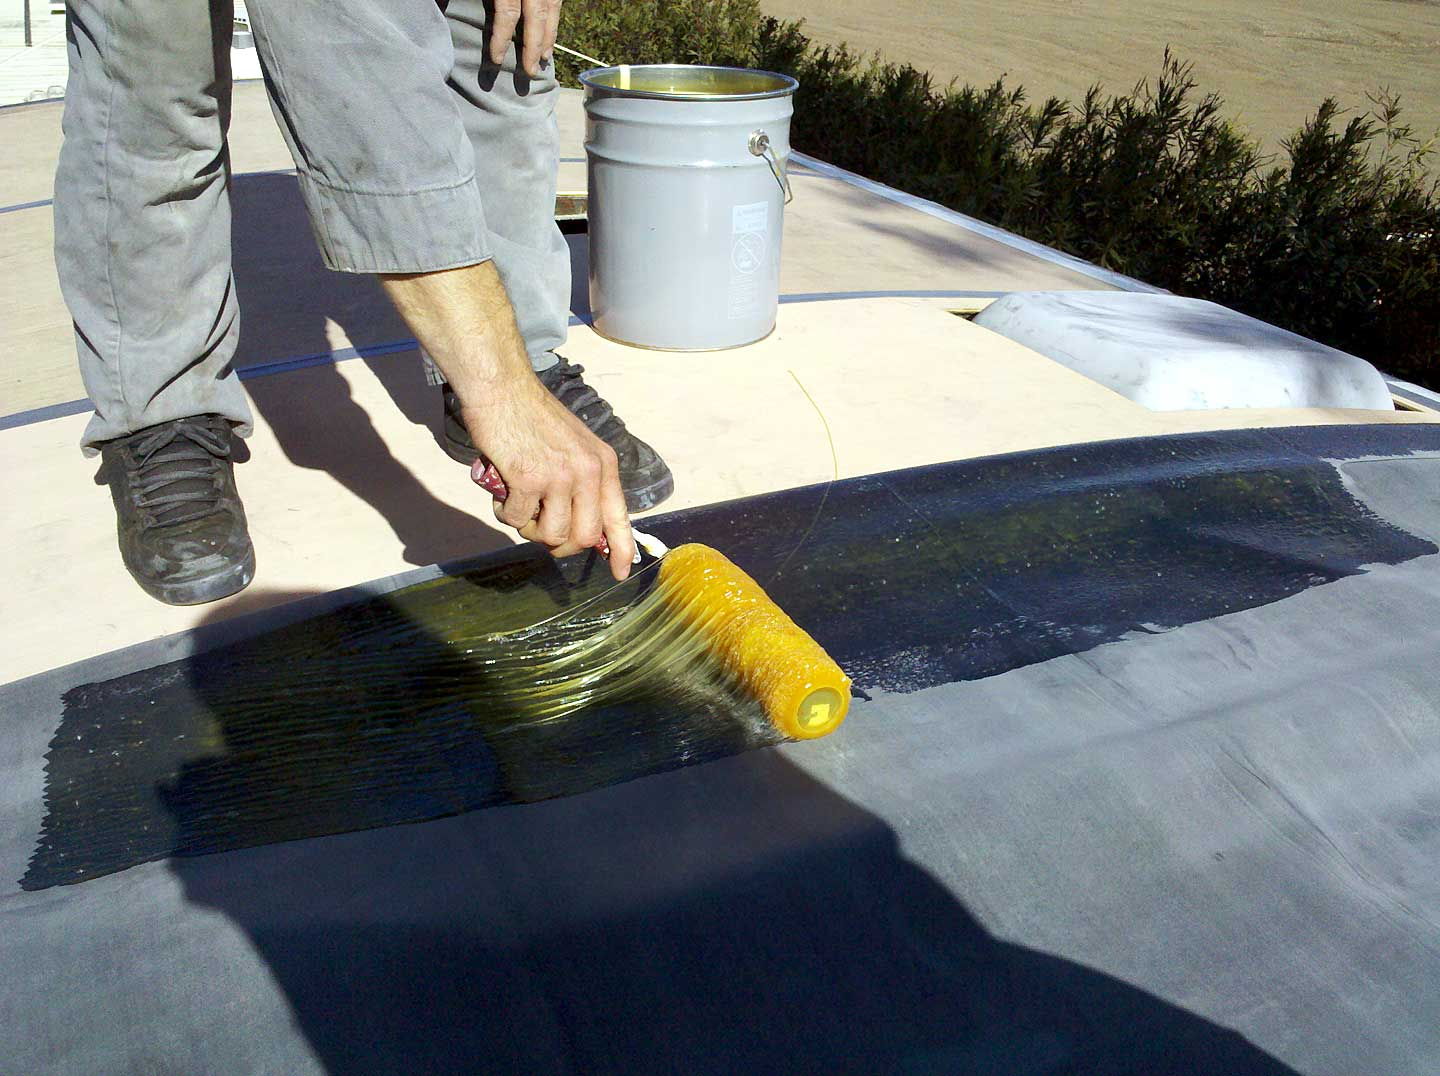
Don't wait till your roofing leaks become worse. Seal, secure, and prolong the life of your motor home roofing today with Fluid Rubber Recreational Vehicle Roof Finishingthe relied on, affordable option that recreational vehicle owners love. The cost of sealing your RV roofing system yourself mainly depends on the top quality of the sealant you select.
One application conceals to a 30' RV. Provided its very easy application and extensive protection, the labor costs remain marginal, making it an eye-catching choice for those seeking to reduce upkeep prices. Got Questions? Download our Application Overview Below RV roofing system sealer is an affordable, comprehensive remedy for roofing system defense.
The price of a complete Motor home roofing system replacement varies from $2,500 to $10,000. A gallon of Liquid Rubber Recreational Vehicle Roof Layer is, and a complete package is.
Sealant supplies affordable roof protection, setting you back concerning per tube for area repair services. Total roof elimination and substitute. $2,500 - $10,000+ (products and labor). Proactive measures intend to delay or get rid of the requirement for full substitute significantly. As this contrast demonstrates, aggressive upkeep of your recreational vehicle roofing system is dramatically much more cost-efficient than dealing with the aftermath of damage.
Motorhome Roof Replacement Silverado, CA
There are several different kinds of recreational vehicle roofing replacement. The most typical kind is a rubber roof covering. Rubber High Lightweight Inexpensive Low No Metal Extremely High Lightweight Expensive Low Yes Fiberglass High Heavy Moderate Low Yes Acrylic Moderate Very Light Low-cost Reduced No Each roof covering type has benefits and disadvantages, so the most effective selection depends on your certain needs.
When you use Liquid Rubber Sealer items, adhere to the application instructions thoroughly. Its liquid type guarantees complete insurance coverage of the entire roofing system.
There are many reasons to regularly recoat your motor home roofing, sealing it against water damage, sunlight, wind, and put on and tear. Like any automobile, RV roof coverings are developed to endure difficult weather, from snow to hail to a deluge. The roof product can still put on out over time.
Rv Slide Out Roof Repair Silverado, CA
Resealing your Recreational vehicle roof covering is a manageable Do it yourself task if you take it detailed. Tidy the whole roof surface using a Recreational vehicle roof covering cleaner and a scrub brush.
: Meticulously eliminate any kind of failing or broken sealant around vents, skylights, and joints making use of a plastic scraper or specialized sealer removal tool. Take care not to damage the roof material.: Using a self-leveling sealant (specifically created for motor home roofing systems), apply a generous grain along all joints, around vents, skylights, and any type of other roofing system infiltrations.
: If you have cracks or damage, think about utilizing recreational vehicle roof fixing tape or a fluid rubber coating, complying with the product directions carefully.: Once the sealant has healed (check product directions for treating time), evaluate the whole roofing system to ensure all locations are properly sealed.: Constantly get in touch with the particular guidelines for your sealant and repair service products.
Even small leakages can create:: Rotting wood, weakening of the roof covering structure, and damage to walls and ceilings.: This produces undesirable living conditions and harms the motor home's interior.: Minimizing the efficiency of your motor home's insulation.: Resolving water damages is considerably a lot more costly than preventative maintenance like regular evaluations and resealing.
Rubber Roof For Camper Silverado, CA
To determine whether your recreational vehicle roofing system is made of EPDM or TPO, comply with these actions:: Find a roofing system vent on your RV.: Unscrew and remove the trim ring to reveal an area of the roofing system material.: Preferably, get rid of a staple from the roof covering product and analyze both sides: If one side is white or dove gray with a black support, it is most likely EPDM.
The key difference between recreational vehicle roofing sealer and finish is their purpose and application.: This is usually made use of to fill up spaces, joints, and splits in the roof covering material. It provides a waterproof barrier to avoid leaks and is often used in certain locations, such as around vents, seams, and other penetrations.

: This is a safety layer that covers the whole roof surface. Coatings are normally used to enhance UV resistance, reflectivity, and general roof durability. They can help extend the life of the roof covering product by supplying an extra barrier against weather aspects. Both items are essential for maintaining a recreational vehicle roofing however serve distinctive features, guaranteeing its long life and performance.
Rv Roof Repair Near Me Silverado, CA
CLEAN, CLEAN CLEAN the roof before using the covering. Did I mention Cleaning the roofing? All the best.
CLEAN, CLEAN CLEAN the roofing system prior to using the covering. Did I discuss Cleaning the roofing? Good Luck.
In this post, we want to share with you exactly how to DIY RV roof fixing. Recognizing how to DIY a great deal of the points that can damage or mess up will certainly conserve you not just a lot of cash on Motor home fixings yet can additionally save you a lot of prospective time in the store!
I may get a tiny compensation when you purchase using my link. Read our Disclaimer Policy for more information. We try to prepare our paths thoroughly to avoid low-hanging items over the roadway. Sometimes, however, we discover ourselves in unplanned scenarios. This is how we finished up with a couple of little splits on the roof covering of our RV.
Rv Roof Repair Service Near Me Silverado, CA
We assumed we were clear of the branches, but we wound up catching a few of them on the far left side of the roofing. There were a total amount of 4-5 small holes in the side of the roof. Originally, we didn't check the roofing due to the fact that we didn't think we strike anything.
Among the rips in our RV roof A few weeks later, we endured a severe thunderstorm and a great deal of rain. Throughout the storm, we discovered that we had a little amount of water dripping through among the lighting fixtures in the bathroom. Thankfully, we did not wind up with any irreversible water damage.
He patched it as best he might with sturdy gorilla tape and after that bought the products needed to do a recreational vehicle roofing fixing. The EPDM rubber roofing material that most Motor homes feature is typically rather tough as much as roofing products go (Rv Roof Repair Service Near Me Silverado). Rubber roofing systems last for years, however they do tear if caught hard enough
In our situation, this suggested removing the gorilla tape that we had actually made use of as a short-term fix while we awaited the materials we purchased to arrive. You'll want to clean the location around the tear that you will certainly be patching well. This allows the patch to appropriately stick and will prevent future leaks.
Rv Fiberglass Roof Repair Silverado, CA
OCRV Center
Address: 23281 La Palma Ave Yorba Linda, CA 92887Phone: (714) 909-1444
Email: art@ocrvcenter.com
OCRV Center
To clean up the roofing, make use of massaging alcohol and either a dustcloth or paper towels. Tucker went over the location 2-3 times to make certain it was cleansed really well. Let it dry entirely before carrying on. Using the Externabond tape After the location has completely dried from cleansing, it's time to add the Eternabond tape, which is a recreational vehicle roofing system repair service tape.
Rv Roof Replacement Silverado, CARv Rubber Roof Replacement Silverado, CA
Best Rv Roof Repair Silverado, CA
Repair Rv Roof Leak Silverado, CA
Rv Rubber Roof Replacement Silverado, CA
Roof Repair For Rv Silverado, CA
Class C Rv Roof Repair Silverado, CA
Rubber Roof For Rv Silverado, CA
Rv Slide Out Roof Repair Silverado, CA
Rv Rubber Roof Maintenance Silverado, CA
Repair Rv Roof Silverado, CA
Rv Rubber Roof Replacement Cost Silverado, CA
Rv Roof Repair Silverado, CA
Motorhome Roof Replacement Silverado, CA
Rv Roof Replacement Silverado, CA
Rv Roof Replacement Silverado, CA
Repair Rv Roof Silverado, CA
Rubber Roofing For Rv Silverado, CA
Rubber Roof For Camper Silverado, CA
Rv Rubber Roof Replacement Cost Silverado, CA
Rv Roof Maintenance Silverado, CA
Rubber Roofing For Rv Silverado, CA
Rv Slide Out Roof Repair Silverado, CA
Rv Rubber Roof Repair Silverado, CA
Rv Roof Replacement Silverado, CA
Rv Trailer Roof Repair Silverado, CA
Rv Rubber Roof Replacement Cost Silverado, CA
Resealing Rv Roof Silverado, CA
Rubber Roofing For Rv Silverado, CA
Rv Rubber Roof Replacement Silverado, CA
Rv Roof Maintenance Silverado, CA
Rv Roof Repair Service Near Me Silverado, CA
Rv Rubber Roof Repair Silverado, CA
Motorhome Roof Replacement Silverado, CA
Rubber Roofing For Rv Silverado, CA
Repair Rv Roof Silverado, CA
Roof Repair For Rv Silverado, CA
Replace Rv Roof Silverado, CA
Rv Trailer Roof Repair Silverado, CA
Best Rv Roof Repair Silverado, CA
Class C Rv Roof Repair Silverado, CA
Rv Roof Replacement Silverado, CA
Roof Repair For Rv Silverado, CA
Rubber Roofing For Rv Silverado, CA
Replace Rv Roof Silverado, CA
Best Rv Roof Repair Silverado, CA
Rv Roof Leak Repair Silverado, CA
Rv Fiberglass Roof Repair Silverado, CA
Rubber Roofing For Rv Silverado, CA
Roof Repair For Rv Silverado, CA
Rv Slide Out Roof Repair Silverado, CA
Rubber Roofing For Rv Silverado, CA
Best Rv Roof Repair Silverado, CA
Rv Roof Repair Fiberglass Silverado, CA
Rv Rubber Roof Maintenance Silverado, CA
Best Rv Roof Repair Silverado, CA
Motorhome Roof Replacement Silverado, CA
Rubber Roof For Camper Silverado, CA
Rv Rubber Roof Replacement Cost Silverado, CA
Rv Roof Maintenance Silverado, CA
Rubber Roofing For Rv Silverado, CA
Epdm Rv Roof Repair Silverado, CA
Rv Slide Out Roof Repair Silverado, CA
Rv Roof Leak Repair Near Me Silverado, CA
Rv Roof Maintenance Silverado, CA
Rv Roof Repair Silverado, CA
Repair Rv Roof Silverado, CA
Rv Rubber Roof Replacement Silverado, CA
Rubber Roof Installation Silverado, CA
Rv Slide Out Roof Repair Silverado, CA
Roof Repair For Rv Silverado, CA
Best Rv Roof Repair Silverado, CA
Rv Roof Replacement Silverado, CA
Rv Trailer Rubber Roof Repair Silverado, CA
Rv Roof Repair Near Me Silverado, CA
Repair Rv Roof Silverado, CA
Class C Rv Roof Repair Silverado, CA
Rv Slide Out Roof Repair Silverado, CA
Finding A Seo Services Near Me Silverado, CA
Find A Good Local Seo Citations Silverado, CA
OCRV Center
Table of Contents
- – Rubber Roof For Camper Silverado, CA
- – OCRV Center
- – Rv Trailer Rubber Roof Repair Silverado, CA
- – Rv Fiberglass Roof Repair Silverado, CA
- – Rv Rubber Roof Maintenance Silverado, CA
- – Rubber Roofing For Rv Silverado, CA
- – Rv Rubber Roof Replacement Silverado, CA
- – Rv Fiberglass Roof Repair Silverado, CA
- – Motorhome Roof Replacement Silverado, CA
- – Rv Slide Out Roof Repair Silverado, CA
- – Rubber Roof For Camper Silverado, CA
- – Rv Roof Repair Near Me Silverado, CA
- – Rv Roof Repair Service Near Me Silverado, CA
- – Rv Fiberglass Roof Repair Silverado, CA
- – OCRV Center
Latest Posts
Web Design Claremont
La Habra Web Designers Near Me
Pomona Internet Marketing Services Electricians
More
Latest Posts
Web Design Claremont
La Habra Web Designers Near Me
Pomona Internet Marketing Services Electricians