All Categories
Featured
Table of Contents
- – Rubber Roof For Rv Rowland Heights, CA
- – OCRV Center
- – Rv Rubber Roof Replacement Cost Rowland Height...
- – Rv Rubber Roof Replacement Rowland Heights, CA
- – Motorhome Roof Replacement Rowland Heights, CA
- – Rv Roof Leak Repair Near Me Rowland Heights, CA
- – Rubber Roof Installation Rowland Heights, CA
- – Replace Rv Roof Rowland Heights, CA
- – Rv Roof Leak Repair Near Me Rowland Heights, CA
- – Rv Rubber Roof Replacement Rowland Heights, CA
- – Rubber Roof Installation Rowland Heights, CA
- – Rubber Roofing For Rv Rowland Heights, CA
- – Rubber Roof For Rv Rowland Heights, CA
- – Rv Roof Replacement Rowland Heights, CA
- – Rv Fiberglass Roof Repair Rowland Heights, CA
- – OCRV Center
Rubber Roof For Rv Rowland Heights, CA
Diluent Water, if needed. Use as received. Clean-up needs only cozy water.
Eye contact If item contacts eye, flush with water for at the very least 15 minutes and seek clinical attention promptly. Skin contact If item get in touches with skin, clean influenced area with soap and water.
Rv Rubber Roof Replacement Cost Rowland Heights, CA
Area nozzle right into joint and apply sealant right into void. Eliminate covering up tape right away. Wipe hands and devices thoroughly before cleaning with soap and water.
PRECAUTIONNot for internal consumption. Direct call of uncured sealant aggravates eyes and might irritate skin. In instance of eye call flush eyes with water for 15 mins and call a medical professional. In case of skin get in touch with, completely clean skin with soap and water. In instance of consumption seek medical attention immediately.
My RV roofing system that needs to be replaced! If you're like me and have even more time than money, then maybe your best choice is to get an old Recreational vehicle and repair it up.
I obtain it. I acquired my motor home over a year back and didn't have the intestines to begin tackling this task until today. However I'm right here to tell you, if I can do it, you can do it. Can I really do it? Stay tuned and learn! I got this 1993 Jamboree for $5000.
Rv Rubber Roof Replacement Rowland Heights, CA
The catch? Water damages! I've never dealt with a RV prior to and I have to admit, I'm afraid. I've done a great deal of house makeover and I'm still frightened. That's because this is all brand-new to me and I have no concept what to expect. Ideally if you're thinking about doing this yourself, following along on my motor home roof covering substitute task will certainly offer you the nerve to dive in! The devices I utilized today.
I got a 12 x 26 SuperMax Cover by ShelterLogic (over $450 on Amazon however I bought mine from Northern Tool for about $340!) and jacked up the legs with timber extensions to make the canopy high enough that I could depend on the roof and stroll beneath it. That seemed to be my least expensive option.
I figured I would rather have it semi-portable so I went with the canopy, plus this allows me to change the elevation backwards and forwards when I require to. Naturally the cheapest choice of all would be to simply toss an excellent tarp over the top of your motor home for rainy days and just work on bright days! Initially I raised the legs with 1 1/2 PVC pipe that fit inside the legs and afterwards I connected a hose clamp around the PVC pipe to hold up the canopy legs.
Motorhome Roof Replacement Rowland Heights, CA
Then I sawed 1 1/4 square legs from 24's to put inside the canopy legs (again holding the cover up with pipeline clamps.) and enhancing the 4 edges with an additional 24 screwed to it. This is still a little saggy. I possibly must have forked out for some inflexible steel pipeline from the beginning.
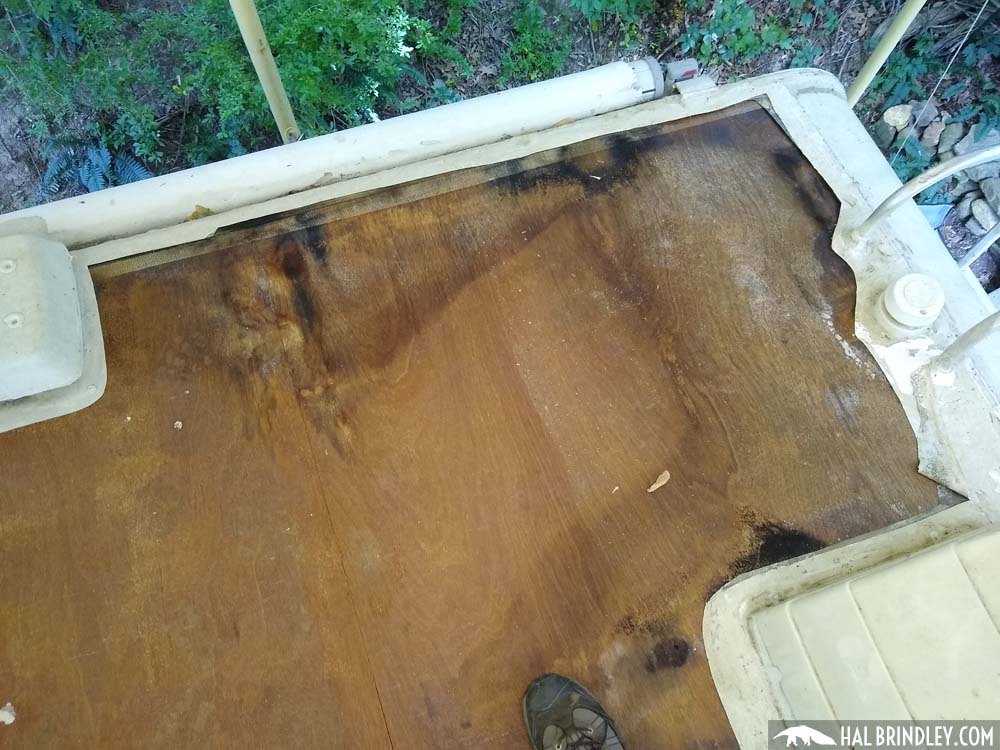
An old spot work on the Motor home rubber roof covering. As you can see, this roof covering has actually had a great deal of issues over the years.
I ordered an energy knife and began slicing. The initial thing I noticed is that there were 2 layers. On the bottom is the original EPDM rubber roof covering layer. I know it's EPDM rubber and not TPO rubber as a result of the black backing. (TPO roofing is white on both sides.) On top of my EPDM roofing system is a slim motor home roofing layer that was used later.
I just left the roofing system finish stuck to the EPDM roofing and drew them up with each other. Starting to peel off roof covering.
Rv Roof Leak Repair Near Me Rowland Heights, CA
All rubber roofing eliminated from camper. There was a sticky under the lower layer of rubber that was still rather well stuck in many places, but with an excellent bit of force it peeled off up cleanly.
Currently I might see all the harmed plywood roof outdoor decking underneath. I chose to peel off the rubber before getting rid of fixtures just so I can see what I was dealing with.
Rubber Roof Installation Rowland Heights, CA
If you think you'll be conserving the roofing decking plywood (not changing it), after that you may save on your own some cleaning difficulty by removing the components initially and after that peeling up the rubber! Detail of water damages on camper roofing. Extra water damaged areas on motor home roof outdoor decking. There was absolutely nothing really horrible that made me feel like I was mosting likely to fail, however most definitely a whole lot of damage and I was getting the feeling I would certainly be replacing a whole lot of the roof covering outdoor decking plywood.
I went for the simplest one initially, a vent cap from a kitchen sink pipes air vent pipe. There is no other means around this, you just have to begin digging up until you reveal the screw heads.
Unscrewing the screws in air vent cap. The screws on this vent cap were hex-head steel screws so I made use of a little socket motorist to remove them.
Replace Rv Roof Rowland Heights, CA
I found an old wasp nest inside the vent cover. This is a sight I'll probably need to get used to, discovering the remains of pet habitation high and low. I invest a terrible great deal of my time creating great wild animals habitat in my backyard so I do not get offended when an animal chooses to set up home in my RV.
Thankfully nobody was home in this old nest so I just threw it. You must try not to harm these pieces (like air vent covers and caps) as you're scraping off the old caulk and sealer simply in situation you require to utilize them once more.
My roofing vent also had an air vent cover over it. Beginning on the roof air vent. Equipment exposed on roofing system air vent cap, the first nut came off tidy.
Screw is spinning. The bolts on this recreational vehicle roofing system air vent cover were nuts on small screws. The initial one came off great with an extension socket set. The second one simply began rotating, suggesting the screw was not dealt with in position yet turning along with the nut. Bummer. A peek at the hardware holding down the roofing air vent cover.
Rv Roof Leak Repair Near Me Rowland Heights, CA
I really did not have any excellent way to hold the bolt in area so rather I opted to saw through the bolts with a reciprocating saw. Sawing through screws on roofing system vent cover. I used a cordless reciprocating saw with a metal-cutting blade yet it was challenging to obtain the blade flat adequate to get to the bolts so near the roofing deck.
Flexing the blade a bit to get to close to the roof covering deck. As soon as I had actually sawn with the remaining 3 bolts, I pried up the cover. Rowland Heights Rv Roof Repair Fiberglass. The brackets that were holding the cover in area. Cover eliminated from roof covering vent. I loosened the braces from the flange of the vent follower itself.
Rv Rubber Roof Replacement Rowland Heights, CA
Many were so old and rusted that they sheared off when I loosened then with a lot of pressure. Unscrewing the braces that held the air vent cover in place. After that I scuffed a lot more caulk and roofing system sealer off the flange of the roofing system vent itself. I quickly discovered there were no extra screws or hardware stifling so I gave up on the scratching and went inside the motor home After scraping the caulk and sealant from flange of roofing vent, no even more screws! Unscrewing the within cover plate of roofing system vent follower in RV washroom.
I chose a drill bit close to the dimension of the shaft of the screws that I had actually currently pulled out and started exploration. Picking a drill little bit for drilling out a screw head.
Rather of popping off the screw head, the plastic simply thawed away around the hot screw head. Hope I don't have to recycle this cover.
Lifting off the old roofing air vent. There are two wires running to the roofing vent (a black hot cable and a white neutral wire) that you'll require to clip to remove the old air vent.
Rubber Roof Installation Rowland Heights, CA
These are the cords attaching the roof venting follower. I clipped them simply above heaven splice joints. Roofing system air vent removed and cleansed up. After clipping the wire and removing the vent, I tidied up any kind of staying goop and got my very first great take a look at the roof frame. It's steel! 1 1/2 inches thick.
Some RV roof coverings are framed with wood, others have steel framework. I had no concept what was in my camper till this factor. Not too delighted about the quantity of corrosion on it, however with any luck it is still structurally sound! I scuffed off some rust and made a large mess inside the bathroom.
Rubber Roofing For Rv Rowland Heights, CA
Oops. Possibly I ought to have placed a tarpaulin down. My final objective of the day was to get the refrigerator air vent cover off. I discovered recreational vehicle sealer blobs at four points on the cover so thought there must be screws under them. I pried them up and discovered Phillips screw heads.
Revealing the screws in the refrigerator vent cap. Peeling off old recreational vehicle roof layer in addition to refrigerator vent cap I also observed that there was a layer of motor home roofing system covering over the air vent cap. These coverings are repainted on with a brush so plainly whoever did this finishing simply blobbed in on top of whatever.
Tearing off the refrigerator roof covering vent after all screws are gotten rid of. Virtually every screw was in good sufficient condition to eliminate with an outlet chauffeur, however a couple were too rustic and required to be turned out with vice hold pliers.
I peeled off the continuing to be rubber roof covering from under the flange and after that scraped off the old putty below. Scuffing off the old putty from the flange of the fridge roof covering vent.
Rubber Roof For Rv Rowland Heights, CA
Whether you simply drove off the dealership's whole lot or you've had your camper for lots of years, you know that your roof isn't under warranty. Therefore, you might want to obtain your trailer's roof changed for the Lifetime Service warranty and tranquility of mind. And we're licensed via the Recreational Car Sector Organization (RVIA) to fix and change Recreational vehicle roof coverings.
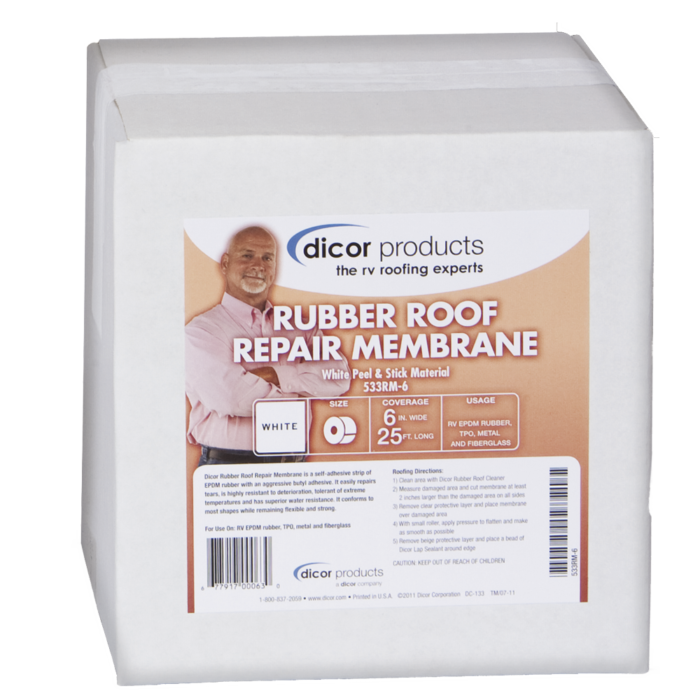
Dicor's Rubber Roofing Repair service Membranes are self-adhesive strips of EPDM rubber that repairs rips, is extremely resistant to wear and tear and has premium water resistance. Plus, it has no asphalt, solvent of VOCs, making it eco-friendly.
Tearing off the fridge roofing system vent after all screws are removed. Almost every screw was in great sufficient condition to get rid of with a socket driver, but a couple were too corroded and required to be twisted out with vice grip pliers.
I peeled off the continuing to be rubber roofing from under the flange and after that scuffed off the old putty underneath. Scraping off the old putty from the flange of the refrigerator roofing air vent.
Rv Roof Replacement Rowland Heights, CA
That's as far as I got on day 1 after concerning 5 hours of lazy job. Not a negative beginning. I likewise discovered this remarkable sludge mold and mildew growing in the compost under the camper. If you have actually never ever seen a slime mold and mildew, inspect out time gaps of them expanding! They are freaking fantastic! A scum mold and mildew under the camper! Currently remain to step 2 when I eliminate the remainder of the roofing fixtures!.
?.!!. Whether you simply drove off the car dealership's lot or you've owned your camper for years, you recognize that your roofing system isn't under service warranty. Hence, you might wish to obtain your trailer's roofing system replaced for the Life time Warranty and comfort. You do not want to mess around with a great deal of sales individuals, either.
Rv Fiberglass Roof Repair Rowland Heights, CA
Motor Home Roof Covering Fixing Florida has actually offered the whole state of Florida for the previous three decades and has been working only on roof covering repair service and replacement. And we're licensed with the Mobile home Sector Organization (RVIA) to fix and change motor home roof coverings. When you call, you'll obtain a cost-free inspection of your roofing in our Hand City Motor Home Service Center area.
Dicor's Rubber Roof Repair service Membranes are self-adhesive strips of EPDM rubber that repair work splits, is highly immune to damage and has remarkable water resistance. Plus, it includes no asphalt, solvent of VOCs, making it eco friendly.
Rv Roof Replacement Rowland Heights, CARoof Repair For Rv Rowland Heights, CA
Rv Roof Repair Near Me Rowland Heights, CA
Repair Rv Roof Rowland Heights, CA
Rubber Roof For Rv Rowland Heights, CA
Repair Rv Roof Leak Rowland Heights, CA
Rubber Roofing For Campers Rowland Heights, CA
Repair Rv Roof Rowland Heights, CA
Replace Rv Roof Rowland Heights, CA
Rv Roof Repair Service Near Me Rowland Heights, CA
Rv Rubber Roof Replacement Cost Rowland Heights, CA
Class C Rv Roof Repair Rowland Heights, CA
Rv Roof Repair Rowland Heights, CA
Rv Roof Replacement Rowland Heights, CA
Rv Rubber Roof Replacement Cost Rowland Heights, CA
Resealing Rv Roof Rowland Heights, CA
Rubber Roofing For Rv Rowland Heights, CA
Rv Roof Repair Fiberglass Rowland Heights, CA
Rv Roof Repair Rowland Heights, CA
Rubber Roofing For Rv Rowland Heights, CA
Rv Rubber Roof Replacement Rowland Heights, CA
Rv Trailer Rubber Roof Repair Rowland Heights, CA
Rubber Roofing For Rv Rowland Heights, CA
Rv Roof Repair Fiberglass Rowland Heights, CA
Rv Roof Maintenance Rowland Heights, CA
Rv Roof Maintenance Rowland Heights, CA
Rv Slide Out Roof Repair Rowland Heights, CA
Rv Roof Repair Near Me Rowland Heights, CA
Rv Rubber Roof Replacement Cost Rowland Heights, CA
Best Rv Roof Repair Rowland Heights, CA
Rv Roof Leak Repair Rowland Heights, CA
Rubber Roof Installation Rowland Heights, CA
Rv Roof Repair Fiberglass Rowland Heights, CA
Best Rv Roof Repair Rowland Heights, CA
Rv Roof Leak Repair Near Me Rowland Heights, CA
Rv Trailer Rubber Roof Repair Rowland Heights, CA
Rv Roof Replacement Rowland Heights, CA
Rv Rubber Roof Replacement Cost Rowland Heights, CA
Roof Repair For Rv Rowland Heights, CA
Rv Rubber Roof Replacement Rowland Heights, CA
Rv Roof Leak Repair Near Me Rowland Heights, CA
Class C Rv Roof Repair Rowland Heights, CA
Rv Rubber Roof Replacement Rowland Heights, CA
Best Rv Roof Repair Rowland Heights, CA
Rubber Roofing For Rv Rowland Heights, CA
Rv Trailer Rubber Roof Repair Rowland Heights, CA
Resealing Rv Roof Rowland Heights, CA
Rv Rubber Roof Maintenance Rowland Heights, CA
Rv Fiberglass Roof Repair Rowland Heights, CA
Rubber Roofing For Campers Rowland Heights, CA
Rv Rubber Roof Repair Rowland Heights, CA
Epdm Rv Roof Repair Rowland Heights, CA
Rv Fiberglass Roof Repair Rowland Heights, CA
Rv Roof Replacement Rowland Heights, CA
Rv Roof Repair Fiberglass Rowland Heights, CA
Rubber Roof Installation Rowland Heights, CA
Repair Rv Roof Rowland Heights, CA
Rv Rubber Roof Maintenance Rowland Heights, CA
Replace Rv Roof Rowland Heights, CA
Rv Roof Repair Near Me Rowland Heights, CA
Rv Roof Repair Near Me Rowland Heights, CA
Repair Rv Roof Leak Rowland Heights, CA
Motorhome Roof Replacement Rowland Heights, CA
Rubber Roofing For Campers Rowland Heights, CA
Rv Rubber Roof Replacement Rowland Heights, CA
Rv Trailer Roof Repair Rowland Heights, CA
Rubber Roofing For Campers Rowland Heights, CA
Rv Roof Maintenance Rowland Heights, CA
Motorhome Roof Replacement Rowland Heights, CA
Rubber Roof For Rv Rowland Heights, CA
Best Rv Roof Repair Rowland Heights, CA
Best Rv Roof Repair Rowland Heights, CA
Rubber Roof For Camper Rowland Heights, CA
Replace Rv Roof Rowland Heights, CA
Rv Rubber Roof Replacement Cost Rowland Heights, CA
Rv Roof Repair Service Near Me Rowland Heights, CA
Rubber Roof For Rv Rowland Heights, CA
Best Rv Roof Repair Rowland Heights, CA
Finding A Good Local Seo Firm Rowland Heights, CA
Close By Seo Companies Rowland Heights, CA
Rv Roof Repair Fiberglass Rowland Heights, CA
OCRV Center
Table of Contents
- – Rubber Roof For Rv Rowland Heights, CA
- – OCRV Center
- – Rv Rubber Roof Replacement Cost Rowland Height...
- – Rv Rubber Roof Replacement Rowland Heights, CA
- – Motorhome Roof Replacement Rowland Heights, CA
- – Rv Roof Leak Repair Near Me Rowland Heights, CA
- – Rubber Roof Installation Rowland Heights, CA
- – Replace Rv Roof Rowland Heights, CA
- – Rv Roof Leak Repair Near Me Rowland Heights, CA
- – Rv Rubber Roof Replacement Rowland Heights, CA
- – Rubber Roof Installation Rowland Heights, CA
- – Rubber Roofing For Rv Rowland Heights, CA
- – Rubber Roof For Rv Rowland Heights, CA
- – Rv Roof Replacement Rowland Heights, CA
- – Rv Fiberglass Roof Repair Rowland Heights, CA
- – OCRV Center
Latest Posts
Laguna Beach Vision And Dental Insurance For Seniors
Medicare Insurance Agent Near Me San Clemente
Brea Planning Life Insurance
More
Latest Posts
Laguna Beach Vision And Dental Insurance For Seniors
Medicare Insurance Agent Near Me San Clemente
Brea Planning Life Insurance