All Categories
Featured
Table of Contents
- – Rv Furnace Troubleshooting Pomona, CA
- – OCRV Center
- – The Rv Repair Centre Pomona, CA
- – Replacement Rv Awning Pomona, CA
- – Rv Repair Shop Pomona, CA
- – Replacement Rv Awning Pomona, CA
- – Repair Rv Pomona, CA
- – Rv Electrical Repair Near Me Pomona, CA
- – Motorhome Repair Shops Near Me Pomona, CA
- – Rv Repair Reviews Pomona, CA
- – Motorhome Roof Repair Pomona, CA
- – Recreational Vehicle Repair Pomona, CA
- – Recreational Vehicle Repair Pomona, CA
- – OCRV Center
Rv Furnace Troubleshooting Pomona, CA
You can do this with your fingers. Generally, there are two little screws that hold the sail button to the fan housing. Eliminate these 2 screws, and after that the sail button must appear. Rv Furnace Repair Pomona. Maintain in mind the direction of the slim sail when eliminating it. In my case, it was right away apparent that the button had particles between the sail and button get in touch with.
Examine/Clean or Change Sail Switch I might have simply cleansed the switch and re-installed it at this moment, and we likely would have been fine. Yet, after undergoing the exercise to remove and reinstall the furnace, I chose the ideal strategy was to place in the brand-new sail switch.
Vacuum Cleaner Heater Area. I extremely suggest cleansing out the furnace area while you have the heater out.
The Rv Repair Centre Pomona, CA
Reinstall Heater to Decking. With job gloves on, turn the furnace to the initial placement, lift it over any kind of limit, and placed it back right into the recessed location.
Reattach the placing screws into the heating system deck to safeguard the heating system back to its original place. If your threading had yellow gas tape, replace the tape before reattaching the lp line. Otherwise, affix the lp line per the step of approximate torque the link had when the line was removed.
In my instance, it was a matter of connecting the wiring harness to the accessibility location's ceiling by method of a bracket and screw. Reinstall Furnace Ductwork This is carried out in reverse order to just how they were removed. Make certain all ductwork is safely attached. For my device, the side duct was a hands-on screw metal plate that needed to be placed in, while the front air ducts were connected with clamps.
Check the Propane Connection with Soapy Water Open up the shutoffs to your lp storage tanks. Use soapy water placed on the gas connection at the furnace and look for bubbles.
Replacement Rv Awning Pomona, CA
Check the Heater Transform the thermostat to "Heater" and increase the temperature until the heater blower fan comes on. You need to hear the heater ignite within twenty seconds or so of the heater's blower follower coming on.
We've talked about some of these in more information listed below. Your motor home furnace thermostat is the primary control point that figures out when and just how much warmth will certainly be supplied by the furnace. It lets you set the temperature level of your heater, along with change it. Keep your RV heater looking great and cool by including a heating system accessibility door in your set up.
Rv Repair Shop Pomona, CA
Recreational vehicle heating system vents (particularly flexible ones) allow you to personalize just how much air circulation appears of your heating system. They likewise give additional safety by working as an obstacle between you and the source of heating; a must-have if you travel with tiny youngsters or animals. Similar to an auto, the furnace electric motor is what maintains your system running.
It's crucial that your electric motor is always in top form. You can get every one of these components via your local RV heating system or accessories shop, in addition to on internet sites such as Amazon. Numerous recreational vehicle owners choose to install their furnace themselves, while others pick to hire an expert to do the benefit them.
When purchasing your Recreational vehicle heating system, the initial point to do is to guarantee it is certified with your design of Recreational vehicle. If picking to set up the heater on your own, the item's handbook might come with setup directions, or you can likewise discover a wide variety of video clip tutorials online to aid you.
Replacement Rv Awning Pomona, CA
The very first thing to do is inspect if the gas is turned on. If it is, then your RV heating system might be experiencing insufficient air circulation with the heater, a bad propane valve at the heater, or a poor regulator at the lp tank. Evaluate your heater to guarantee there aren't any type of blockages.
If your furnace hasn't been activated for rather time, then this is responsible for the odor. Enable the furnace to run for a bit and you must soon notice that the scent vanishes. If the heater is still emitting a poor smell after this time, transform it off and ensure there isn't a propane leak.
Depending on your design of heater, you may have a pilot light. Modern RV furnaces have a straight spark ignition system that changes a pilot light.
Repair Rv Pomona, CA
If this holds true, after that it's best to phone your regional recreational vehicle furnace professional. Check all of the vents in your Motor home. There shouldn't be signs of residue on your exhaust air vent, so this may be telling you there's incorrect burning, which is leaving unburned fuel as it is venting.
Camping is enjoyable, yet no one wants to spend a chilly evening without warm. Prior to you require your RV heating unit, you will certainly intend to make certain it remains in good running condition, given that it is utilized the least in your motor home. Here are a few very easy recreational vehicle heater fixing ideas and fundamental repair services, to give you a helping hand.
Rv Electrical Repair Near Me Pomona, CA
If the furnace still doesn't run, try lighting an oven heater. This will certainly make certain the range is obtaining propane. If the pilot won't light, check to make sure you have gas. Another RV heating unit fixing pointer is: inspect the thermocouple. Make sure it is clear of any spider webs or insect nests.
If the thermocouple is bad, remove it and acquire one precisely the same as the one you are replacing. The thermocouple is a simple and cost-effective repair. The cost to acquire a new one has to do with $10.00. The thermocouple is a bimetallic sensor whose electrical resistance modifications with temperature. This adjustment in resistance is discovered by the control system, to make sure there is a fire prior to it opens the primary gas shutoff.
The heat runs on 12V, not 110. An additional excellent Motor home heating unit fixing pointer: if you see residue on the exterior of the RV by the exhaust air vent, examine all vents.
Motorhome Repair Shops Near Me Pomona, CA
With these tips and useful hints on fundamental fixings on your RV heating unit, you ought to be able to fix and keep your heating unit in tip-top shape. These fundamental repairs might be simply what maintains you from making a costly phone call.
The last point anyone desires to hear (particularly after they've made the acquisition) is the feared information that there's a mountain of fixings to emulate that may cost as high as, if not more than, the motor home is worth. If the obligations connected with owning a recreational vehicle are new to you and/or you're trying to find assistance to improve accustomed with exactly how to make use of, look after, and store your motor home to obtain one of the most out of it for many years ahead while maintaining every person secure, we can aid with that as well.
Thanks for uploading this-- I hope I never need to watch it, yet the moment may come.
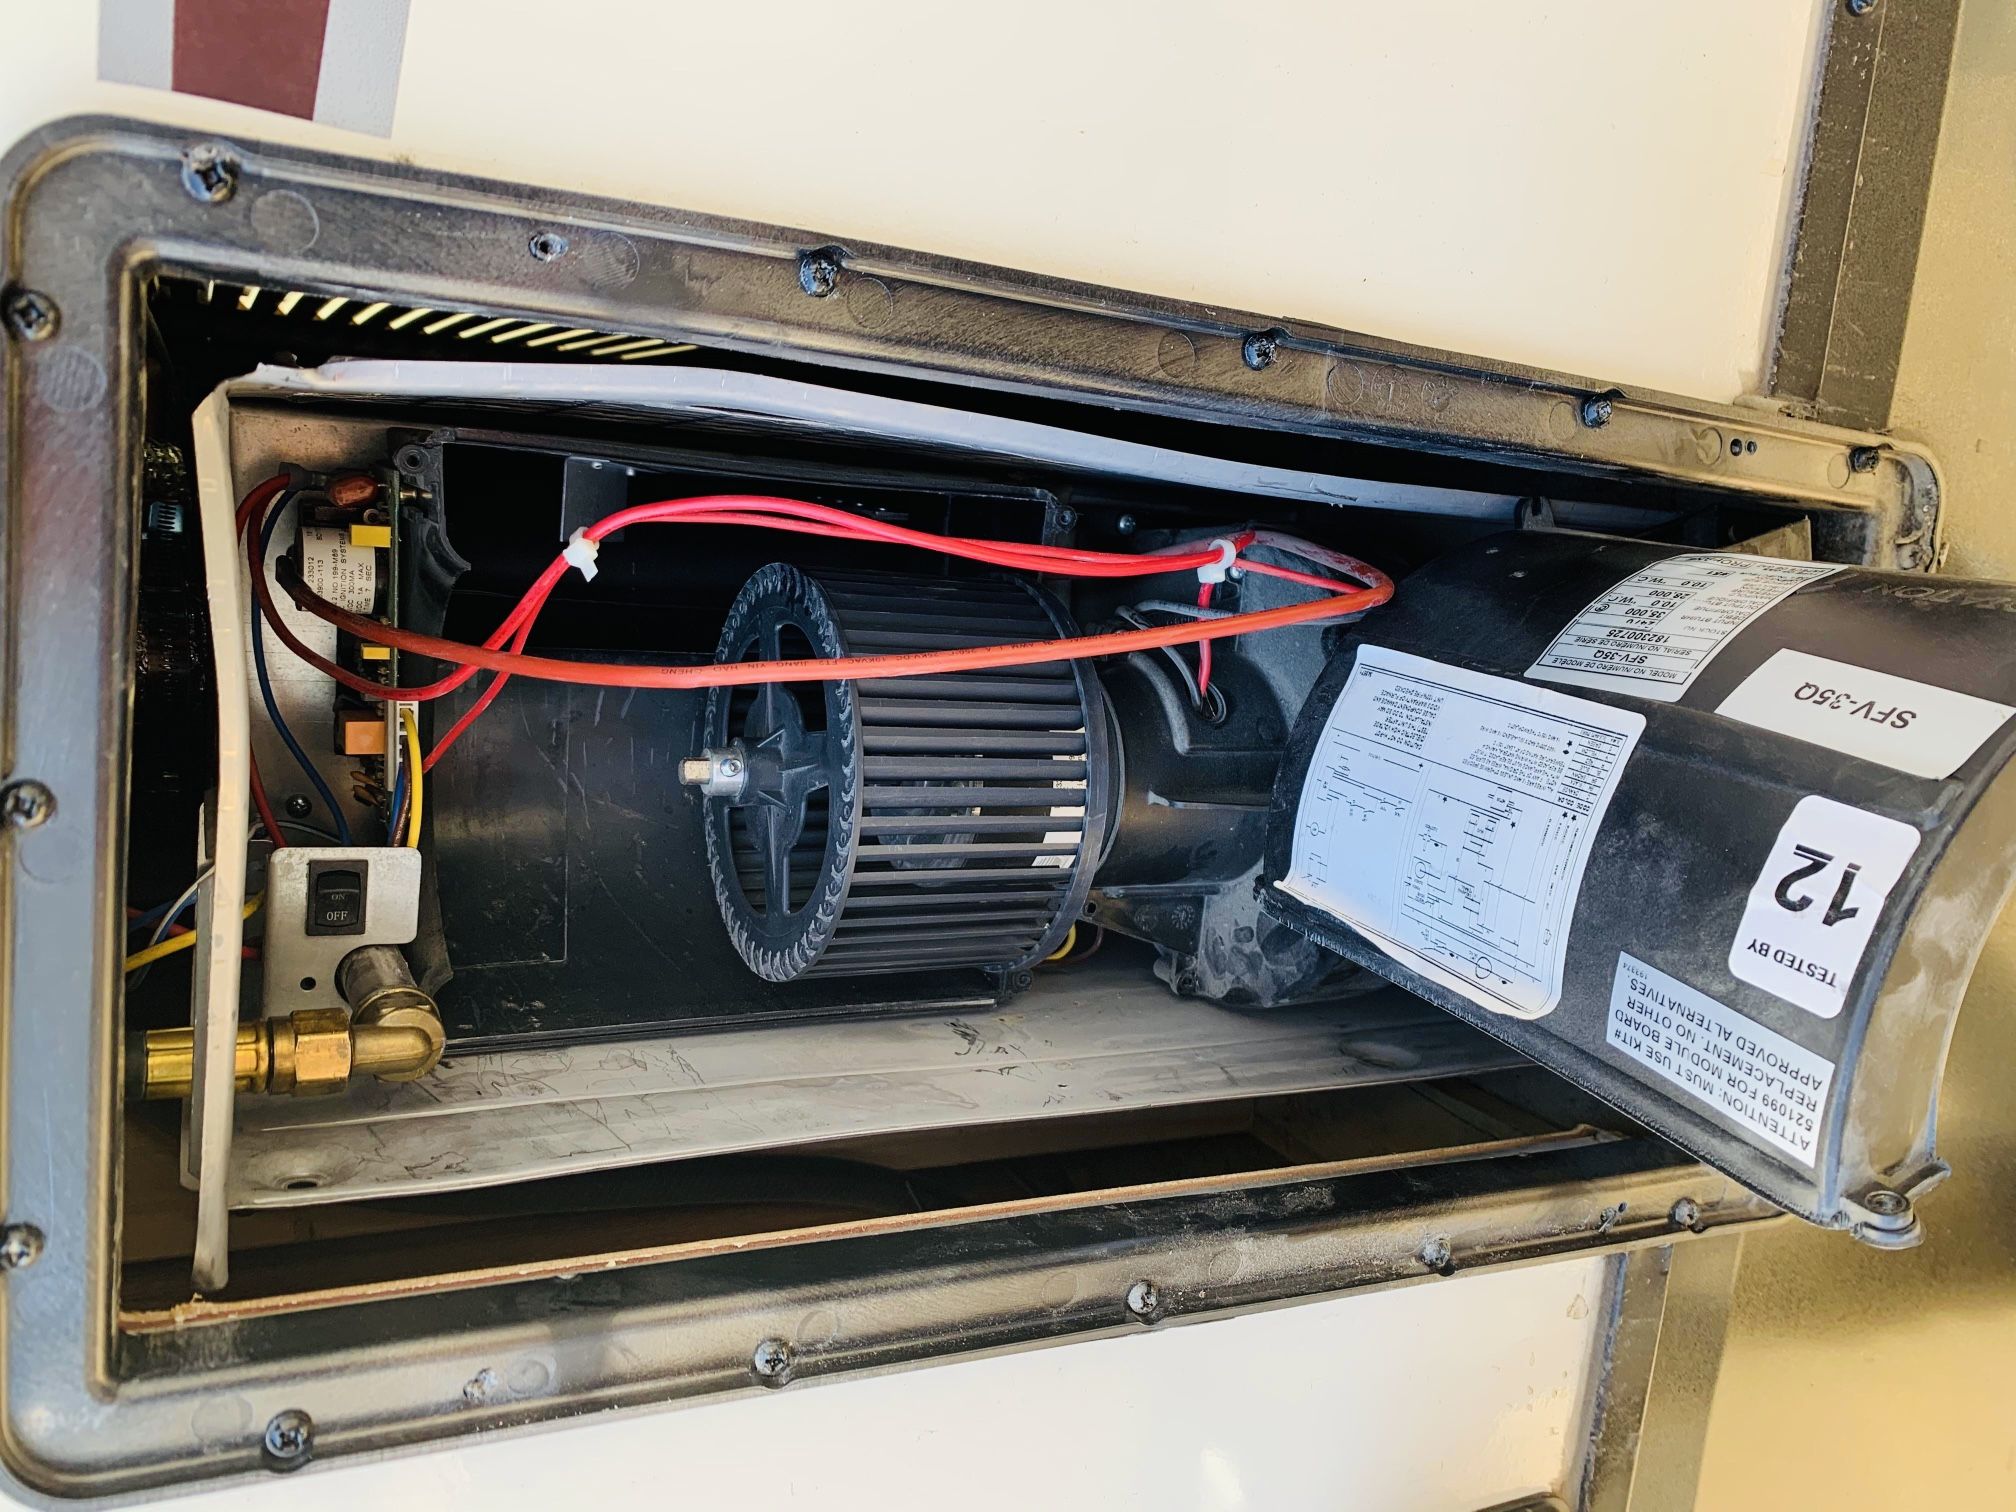
The heater in your RV is very similar to the one in your house. There's not an entire great deal of upkeep that's required of it, however there are some things that you require to know to make it run much more efficient and for fixing purposes. Currently, the furnace in this one, this happens to be a 2003 Brave and we're gon na take this cover off here the backside and we can see that we have actually got a suburban model in this one and we've drawn this one out as an instance of what we have.
Rv Repair Reviews Pomona, CA
And the method the system functions is when you have your thermostat established to the desired temperature level and it requires warm, it's gon na undergo the circuit card, which we see on this unit right here is gon na enter into below and it's gon na start the fan to start with.
It's gon na kind of tidy everything out. And what it's additionally looking for is it wants to make sure we have appropriate fan speed, appropriate voltage coming in.
Motorhome Roof Repair Pomona, CA

And it's gon na be sitting even more like this beyond of it. Yet we require enough follower rate and airspeed to raise this and you listen to that little clicking in there. What that's doing is it's stating, fine, I have enough airspeed, I have sufficient voltage so whatever else is gon na work correctly in below since it's pushing this up and shutting that circuit implying the voltage can go via and tell whatever is great prior to it begins to light the burner setting up.
And what that does is if this gets too warm, then that's gon na once more, open and claim, no way, we have problems. We're gon na shut the system down. And a couple of points that you require to be mindful of, on the within of your gear, you're either gon na have a plenum like this one runs all along the within and it's got the air duct job in the floor simply like you would certainly in a home or you're gon na have a collection of what we call elephant trucks, and they're the, trunks.
If you plug those vents up inside that motor home, after that you limit the air circulation. Which air flow then indicates that this is gon na warm up, either our temperatures switch is gon na shut the system off or our sail switch is gon na shut it off. Exact same point with our corrugated hose pipes, if you start saving items in your cabinets, below, and you start squeezing those.
So once again, we're gon na get either overheating on this side or we're gon na get that sail button that is going to open the circuit and say, nope, we can not run. If your system isn't running, there's a number of points that we consider. The very first thing is you have actually obtained to see to it that you recognize that these run a 12 volt system and you require at least 10.5 volts for this fan to go quick enough to open up that sail button.
Recreational Vehicle Repair Pomona, CA
It's gon na kind of tidy whatever out. And what it's additionally looking for is it wants to make certain we have appropriate follower speed, correct voltage coming in.
And it's gon na be sitting more such as this beyond of it. We need sufficient fan speed and airspeed to lift this and you listen to that little hitting in there. What that's doing is it's claiming, fine, I have adequate airspeed, I have adequate voltage so whatever else is gon na function appropriately in here because it's pressing this up and closing that circuit meaning the voltage can experience and tell everything is good prior to it begins to light the burner assembly
Recreational Vehicle Repair Pomona, CA
And what that does is if this obtains also warm, then that's gon na once more, open and claim, no way, we have issues. We're gon na close the system down. And a pair of points that you need to be mindful of, on the within of your rig, you're either gon na have a plenum like this one runs all along the within and it's got the duct job in the flooring just like you would certainly in a home or you're gon na have a collection of what we call elephant vehicles, and they're the, trunks.
If you connect those vents up inside that motor home, then you restrict the air flow. Which airflow then indicates that this is gon na heat up, either our temps switch over is gon na shut the system off or our sail button is gon na close it off. Same thing with our corrugated hose pipes, if you begin storing products in your closets, beneath, and you begin squeezing those.
OCRV Center
Address: 23281 La Palma Ave Yorba Linda, CA 92887Phone: (714) 909-1444
Email: art@ocrvcenter.com
OCRV Center
Once again, we're gon na get either overheating on this side or we're gon na get that sail button that is going to open the circuit and state, no way, we can not run. If your device isn't running, there's a number of points that we look at. The initial point is you have actually reached make certain that you recognize that these run off a 12 volt system and you require at the very least 10.5 volts for this fan to go fast sufficient to open up that sail switch.
Rv Electrical Repair Pomona, CARepair Rv Pomona, CA
Replacement Rv Awning Pomona, CA
Motorhome Repairs Pomona, CA
Repair Rv Awning Pomona, CA
Replacement Rv Awning Pomona, CA
Repair Rv Pomona, CA
The Rv Repair Centre Pomona, CA
Rv Repair Reviews Pomona, CA
Repair Rv Pomona, CA
Rv Awning Fabric Repair Pomona, CA
Rv Repair Reviews Pomona, CA
Rv Repair Shop Pomona, CA
Rv Awning Repair Pomona, CA
Rv Refrigeration Repair Pomona, CA
Rv Repair Near Me Pomona, CA
Rv Refrigerator Repair Pomona, CA
Recreational Vehicle Repair Pomona, CA
Rv Furnace Repair Near Me Pomona, CA
Recreational Vehicle Repair Pomona, CA
Awning Repair Rv Pomona, CA
Rv Refrigeration Repair Pomona, CA
Motorhome Repairs Pomona, CA
Awning Repair Rv Pomona, CA
Rv Water Damage Repair Pomona, CA
Rv Blinds Repair Pomona, CA
Rv Aluminum Siding Repair Pomona, CA
Local Rv Repair Pomona, CA
Rv Repair Near Me Pomona, CA
Local Rv Repair Pomona, CA
Awning Repair Rv Pomona, CA
Motorhome Mechanic Near Me Pomona, CA
Rv Awning Fabric Repair Pomona, CA
Motorhome Roof Repair Pomona, CA
Rv Awning Repair Near Me Pomona, CA
Rv Repair Shop Pomona, CA
Rv Electrical Repair Pomona, CA
Rv Awning Repair Pomona, CA
Rv Repair Shop Pomona, CA
Rv Refrigeration Repair Pomona, CA
Rv Awning Fabric Repair Pomona, CA
Local Rv Repair Pomona, CA
Rv Furnace Repair Pomona, CA
Awning Repair Rv Pomona, CA
Motorhome Mechanic Near Me Pomona, CA
Repair Rv Awning Pomona, CA
Repair Rv Awning Pomona, CA
Rv Awning Repair Near Me Pomona, CA
Motorhome Repair Shops Near Me Pomona, CA
Rv Awning Repair Near Me Pomona, CA
Rv Awning Repair Near Me Pomona, CA
Local Rv Repair Pomona, CA
Awning Repair Rv Pomona, CA
Rv Furnace Repair Near Me Pomona, CA
Rv Furnace Troubleshooting Pomona, CA
Rv Ac Repair Near Me Pomona, CA
Motorhome Repair Shops Near Me Pomona, CA
Rv Blinds Repair Pomona, CA
Rv Repair Reviews Pomona, CA
Awning Repair Rv Pomona, CA
Awning Repair Rv Pomona, CA
Rv Awning Repair Pomona, CA
Rv Blinds Repair Pomona, CA
Rv Furnace Troubleshooting Pomona, CA
Rv Specialists Pomona, CA
Rv Blinds Repair Pomona, CA
Rv Furnace Repair Pomona, CA
Rv Refrigerator Repair Pomona, CA
Rv Specialists Pomona, CA
Rv Refrigerator Repair Pomona, CA
Rv Furnace Repair Near Me Pomona, CA
Rv Awning Repair Near Me Pomona, CA
Repair Rv Awning Pomona, CA
Rv Repair Near Me Pomona, CA
Rv Water Damage Repair Pomona, CA
Motorhome Roof Repair Pomona, CA
Rv Electrical Repair Pomona, CA
Rv Electrical Repair Pomona, CA
Near My Location Seo Agencies Pomona, CA
In My Area Seo Companies Near Me Pomona, CA
Rv Furnace Repair Pomona, CA
OCRV Center
Table of Contents
- – Rv Furnace Troubleshooting Pomona, CA
- – OCRV Center
- – The Rv Repair Centre Pomona, CA
- – Replacement Rv Awning Pomona, CA
- – Rv Repair Shop Pomona, CA
- – Replacement Rv Awning Pomona, CA
- – Repair Rv Pomona, CA
- – Rv Electrical Repair Near Me Pomona, CA
- – Motorhome Repair Shops Near Me Pomona, CA
- – Rv Repair Reviews Pomona, CA
- – Motorhome Roof Repair Pomona, CA
- – Recreational Vehicle Repair Pomona, CA
- – Recreational Vehicle Repair Pomona, CA
- – OCRV Center
Latest Posts
Laguna Beach Vision And Dental Insurance For Seniors
Medicare Insurance Agent Near Me San Clemente
Brea Planning Life Insurance
More
Latest Posts
Laguna Beach Vision And Dental Insurance For Seniors
Medicare Insurance Agent Near Me San Clemente
Brea Planning Life Insurance