All Categories
Featured
Table of Contents
- – Repair Rv Roof Leak Norco, CA
- – OCRV Center
- – Repair Rv Roof Norco, CA
- – Rv Roof Maintenance Norco, CA
- – Best Rv Roof Repair Norco, CA
- – Epdm Rv Roof Repair Norco, CA
- – Rv Fiberglass Roof Repair Norco, CA
- – Rv Roof Replacement Norco, CA
- – Resealing Rv Roof Norco, CA
- – Repair Rv Roof Leak Norco, CA
- – OCRV Center
Repair Rv Roof Leak Norco, CA
In this post, we desire to share with you how to Do it yourself Motor home roofing repair. Knowing just how to DIY a great deal of the points that can break or mess up will certainly save you not only a whole lot of money on Recreational vehicle repair services but might also conserve you a whole lot of potential time in the store!
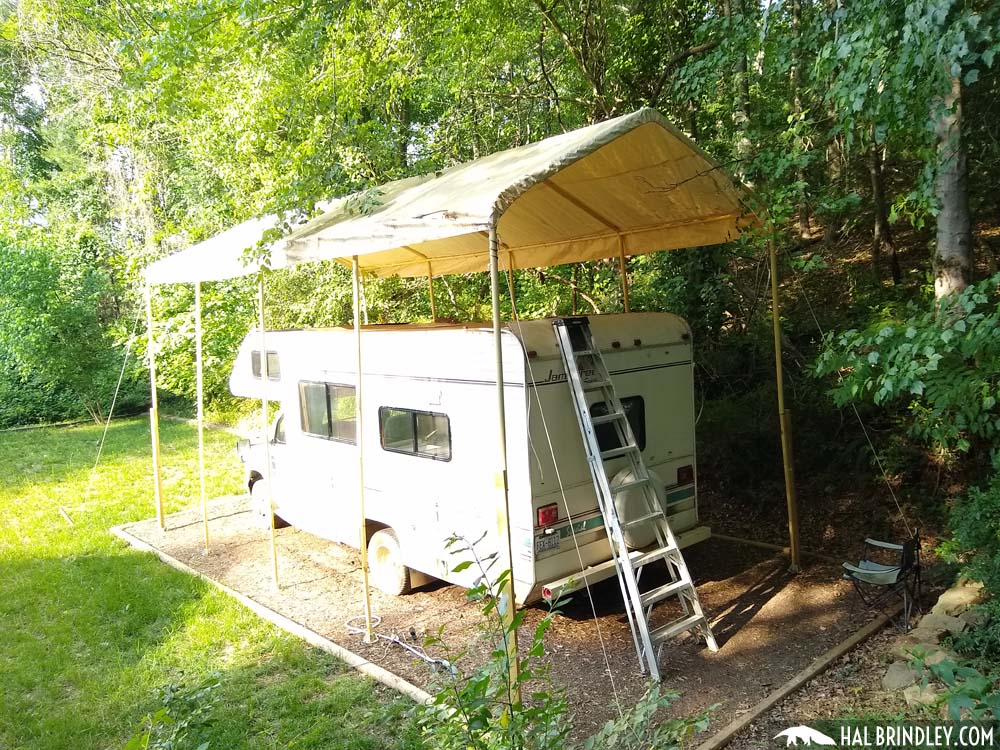
I might receive a tiny compensation when you buy utilizing my web link. We try to plan our paths carefully to prevent low-hanging items over the roadway. Often though, we discover ourselves in unintended situations. This is just how we finished up with a couple of tiny tears on the roof of our motor home.
Repair Rv Roof Norco, CA
We thought we were free from the branches, yet we finished up catching a few of them on the far left side of the roof. There were an overall of 4-5 tiny holes in the side of the roofing system. We didn't inspect the roof covering due to the fact that we really did not think we strike anything.

Throughout the storm, we found that we had a percentage of water leaking through among the light components in the washroom. Thankfully we did not finish up with any irreversible water damage. After the storm, Tucker rose on the roofing system and that is when he found the holes.
Rv Roof Maintenance Norco, CA
You'll desire to clean up the area around the tear that you will certainly be covering well. To cleanse the roofing, make use of rubbing alcohol and either a rag or paper towels.
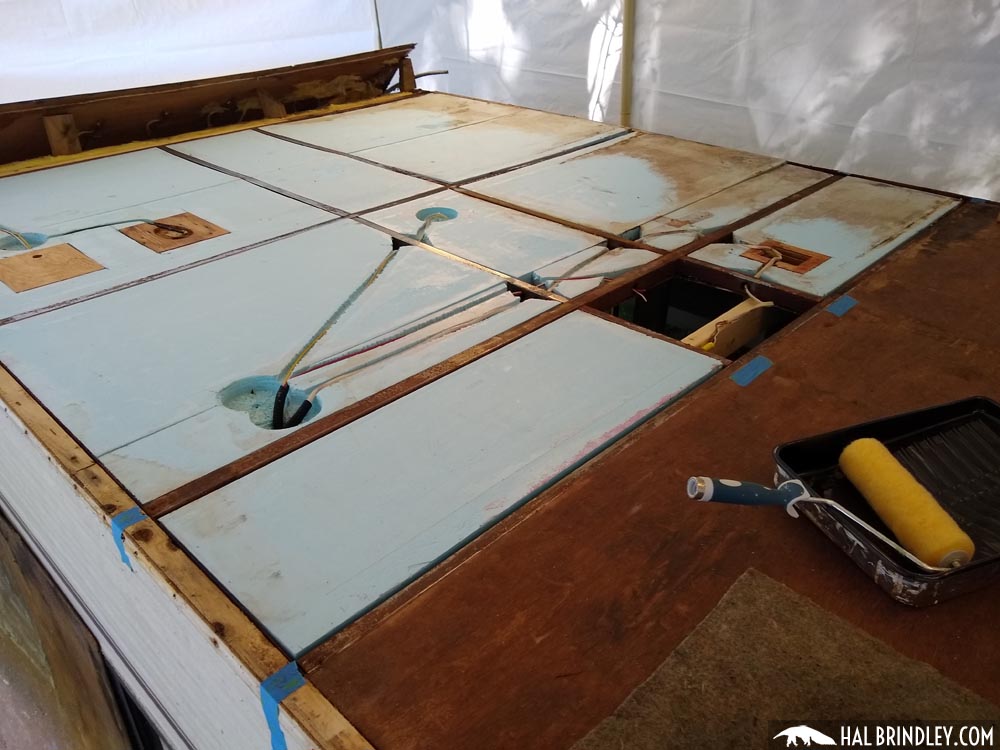
, which is a Recreational vehicle roofing repair service tape. Eternabond makes the ideal Recreational vehicle roofing system tapes and is a great item to have on hand for the emergency situation repair work of a leaking roof.
Best Rv Roof Repair Norco, CA
Remove the backing and use meticulously over the tear in the roofing system. Once it has actually touched the roof it sticks rather quickly so you'll intend to make certain and position it right the very first time. Beginning with one side and smooth it out. Press securely and continue to scrub it and ravel the spot for numerous mins.
This rubber sealant develops a safe and secure additional seal on your rubber roofing and guarantees that the leakage is effectively sealed. This is most likely the very same sealer that was made use of on your recreational vehicle roof covering to secure around the roofing system vents, ac system, and so on. There are a great deal of Dicor RV roof covering repair items that you can acquire consisting of roof finishings, roof covering sealer, and a lot more for the surface of your roofing.
If the damages gets on the side of your camper roofing system like ours was, you may have some Dicor that diminishes the side. Clean any excess off and don't allow it to diminish also much. This is a self-leveling sealer so you ought to wind up with a rather level spot.
Epdm Rv Roof Repair Norco, CA
Over time, it will totally set and you will not have to stress about it any longer. After the Dicor lap sealant was used If the leak in your motor home roof covering is a little location, the finest method to repair it is to follow our step-by-step overview and fix the broken location yourself to fix the tiny leak
An easy recreational vehicle roof covering repair, as we did on our fixing task, is reasonably economical and should cost less than $50 for DIY motor home owners. To change an entire motor home roofing with substantial damage would certainly result in much even more costly fixings. I hope that you have actually found the information in this message helpful.
Rv Fiberglass Roof Repair Norco, CA
This will certainly give you comfort and confirm that your roof remains in great shape. Just how to DIY Your Recreational Vehicle Roofing System Repair Work.
If you do not examine, reseal, and fix your recreational vehicle roofing system consistently, you will wind up with some pretty dreadful water damage. This is something that will promptly decrease the value of your RV and can even provide it unusable. Taking treatment of your RV roofing is something you can possibly do all on your very own.
After regarding 10 years, it will also be required to reseal the whole roof covering. To do this, you'll need to climb up onto the roofing, however be really cautious when you do.
Next off, you'll intend to cleanse your roofing system completely, so regarding get rid of any kind of dust fragments. You can make use of a long handled brush for this, yet never use a cleaner which contains oil solvents or citrus ingredients on your rubber or vinyl roofing system. These kinds of cleansers will create permanent damage to the surface area.
Rv Roof Replacement Norco, CA
While you're cleaning, remove any debris or old roofing material, yet beware while you do this as you can easily extend a tear, or even punch a hole through the roofing. You should after that dry the roof covering as best as you can. Keep In Mind: Rubber motor home roofings can be really unsafe when wet.
After the roof covering is tidy, you are mosting likely to desire to evaluate the joints for openings, cracks or peeling, so you can reseal wherever needed. On top of that, you'll wish to resolve resealing all seams once a year whether or not they show indicators of wear.
Resealing Rv Roof Norco, CA
When it comes to selecting the best RV roofing sealant, you'll want to take into consideration whether you are fixing a tear, resealing a seam, or securing the whole roofing system. It can be utilized for place sealing or to reseal every seam on the RV roof. Just clean the location well and use with a caulk weapon.
Repair Rv Roof Leak Norco, CA
Similar to the EPDM system detailed above, this finish item will cover your TPO roofing system and aid it last another 10 years. Before EPDM and TPO, metal was the material of selection for Motor home roofings.
The aforementioned EternaBond is still king when it comes to fixing little damages on a steel roof covering. RV steel roof coverings do need to be completely resealed from time to time.
Rubber Roof Installation Norco, CARepair Rv Roof Leak Norco, CA
Rv Roof Repair Norco, CA
Best Rv Roof Repair Norco, CA
Rubber Roof Installation Norco, CA
Rv Roof Leak Repair Norco, CA
Rubber Roofing For Rv Norco, CA
Motorhome Roof Replacement Norco, CA
Repair Rv Roof Leak Norco, CA
Rv Roof Leak Repair Norco, CA
Class C Rv Roof Repair Norco, CA
Rubber Roof Installation Norco, CA
Rv Roof Repair Service Near Me Norco, CA
Rv Roof Repair Near Me Norco, CA
Rv Roof Repair Norco, CA
Rv Roof Repair Norco, CA
Rv Rubber Roof Repair Norco, CA
Motorhome Roof Replacement Norco, CA
Rv Rubber Roof Maintenance Norco, CA
Repair Rv Roof Leak Norco, CA
Motorhome Roof Replacement Norco, CA
Rubber Roofing For Rv Norco, CA
Rv Rubber Roof Replacement Norco, CA
Rv Trailer Rubber Roof Repair Norco, CA
Rubber Roof Installation Norco, CA
Rubber Roof For Camper Norco, CA
Rv Rubber Roof Replacement Norco, CA
Rubber Roof For Camper Norco, CA
Rv Roof Repair Near Me Norco, CA
Rubber Roof Installation Norco, CA
Rv Roof Leak Repair Norco, CA
Rubber Roof For Camper Norco, CA
Rv Roof Leak Repair Near Me Norco, CA
Repair Rv Roof Norco, CA
Rv Roof Maintenance Norco, CA
Rv Rubber Roof Replacement Cost Norco, CA
Repair Rv Roof Norco, CA
Rubber Roof For Rv Norco, CA
Replace Rv Roof Norco, CA
Motorhome Roof Replacement Norco, CA
Resealing Rv Roof Norco, CA
Epdm Rv Roof Repair Norco, CA
Rv Roof Repair Service Near Me Norco, CA
Rubber Roofing For Campers Norco, CA
Rv Rubber Roof Maintenance Norco, CA
Rubber Roof For Rv Norco, CA
Rv Slide Out Roof Repair Norco, CA
Rv Rubber Roof Replacement Cost Norco, CA
Rv Rubber Roof Replacement Cost Norco, CA
Replace Rv Roof Norco, CA
Rubber Roof For Camper Norco, CA
Rubber Roof Installation Norco, CA
Rv Roof Repair Near Me Norco, CA
Rv Roof Maintenance Norco, CA
Resealing Rv Roof Norco, CA
Rv Roof Maintenance Norco, CA
Rv Rubber Roof Repair Norco, CA
Rubber Roof Installation Norco, CA
Rv Rubber Roof Repair Norco, CA
Roof Repair For Rv Norco, CA
Repair Rv Roof Norco, CA
Repair Rv Roof Norco, CA
Roof Repair For Rv Norco, CA
Rv Rubber Roof Replacement Cost Norco, CA
Rubber Roofing For Rv Norco, CA
Rv Trailer Rubber Roof Repair Norco, CA
Rubber Roofing For Campers Norco, CA
Repair Rv Roof Leak Norco, CA
Replace Rv Roof Norco, CA
Rubber Roofing For Campers Norco, CA
Replace Rv Roof Norco, CA
Replace Rv Roof Norco, CA
Rubber Roof Installation Norco, CA
Epdm Rv Roof Repair Norco, CA
Rubber Roof For Rv Norco, CA
Rubber Roofing For Campers Norco, CA
Class C Rv Roof Repair Norco, CA
Repair Rv Roof Norco, CA
Affordable Seo Consultant Norco, CA
Companies Near Me Seo Management Norco, CA
OCRV Center
Table of Contents
- – Repair Rv Roof Leak Norco, CA
- – OCRV Center
- – Repair Rv Roof Norco, CA
- – Rv Roof Maintenance Norco, CA
- – Best Rv Roof Repair Norco, CA
- – Epdm Rv Roof Repair Norco, CA
- – Rv Fiberglass Roof Repair Norco, CA
- – Rv Roof Replacement Norco, CA
- – Resealing Rv Roof Norco, CA
- – Repair Rv Roof Leak Norco, CA
- – OCRV Center
Latest Posts
Irvine Wordpress Web Design
Best Web Design Company Glendora
Walnut Best Local Seo
More
Latest Posts
Irvine Wordpress Web Design
Best Web Design Company Glendora
Walnut Best Local Seo