All Categories
Featured
Table of Contents
- – Rv Trailer Rubber Roof Repair Garden Grove, CA
- – OCRV Center
- – Rv Trailer Rubber Roof Repair Garden Grove, CA
- – Rv Fiberglass Roof Repair Garden Grove, CA
- – Rv Slide Out Roof Repair Garden Grove, CA
- – Class C Rv Roof Repair Garden Grove, CA
- – Rubber Roof For Camper Garden Grove, CA
- – Rv Roof Repair Near Me Garden Grove, CA
- – Rubber Roof Installation Garden Grove, CA
- – Rv Roof Leak Repair Garden Grove, CA
- – Rubber Roof For Camper Garden Grove, CA
- – Rv Roof Repair Near Me Garden Grove, CA
- – Repair Rv Roof Garden Grove, CA
- – Class C Rv Roof Repair Garden Grove, CA
- – OCRV Center
Rv Trailer Rubber Roof Repair Garden Grove, CA
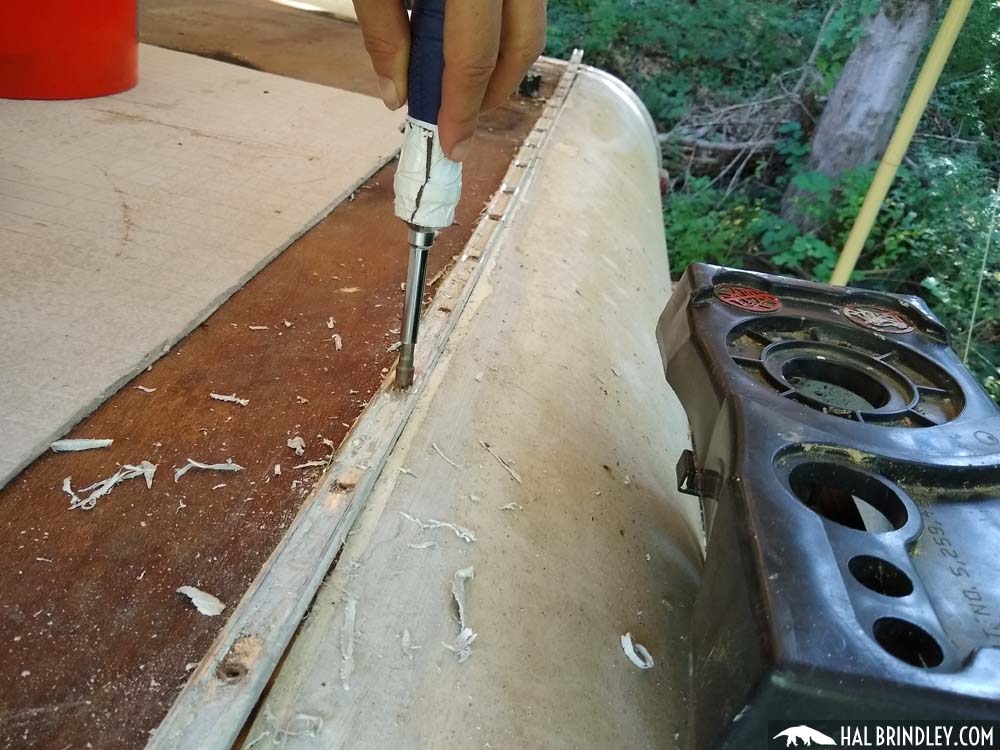
Roofing system demolition, certainly. We separate the rubber roofing right into sections to make removing it an easier process. Demolition continues with the elimination of sealant from around vents and taking off the remainder of the molding. As soon as finished, we can reach service the motor home roof covering repair work. Removing the sealer allows us to find water damages from leaks.
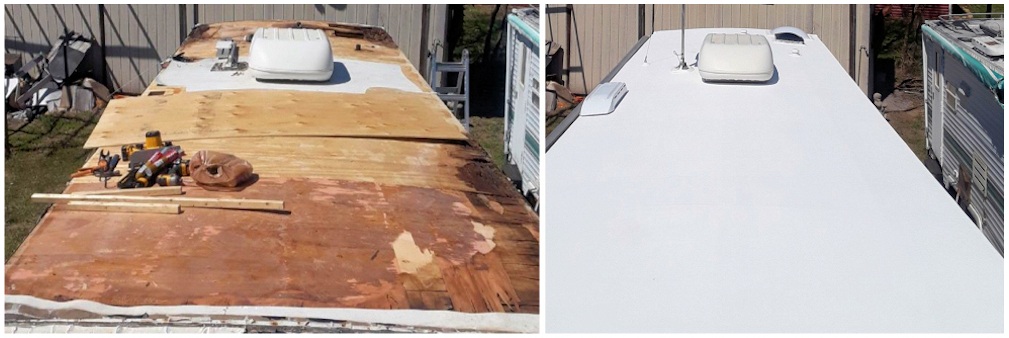
This Recreational vehicle roofing system repair work addresses both an old roofing system as well as underlying damages impacting the honesty of the Recreational vehicle. Once the framework beneath is sound, we begin the process of securing it back up and changing that old rubber roofing system.
We likewise require to place back all of the vents we got rid of, making certain the seals are great and limited to protect against even more damages. Keep in mind, one little split in a seal is all it takes to enable water in to harm that stunning brand-new roof all over once more.
The new roofing system is water-tight, looks excellent, and is a fantastic upgrade from the initial, degrading rubber roofing. This sort of functional RV upgrade you make right into fantastic brand-new motor home interior features. Since you've seen the fundamentals of recreational vehicle roof repair service and RV rubber roof covering substitute, you might be tempted to attempt it by yourself.
Rv Trailer Rubber Roof Repair Garden Grove, CA
We understand that some of you love to work on your Recreational vehicles and attempt your very own Motor home fixings. If you have actually got a leaking roofing system or an old rubber roof covering that needs substitute and you require some suggestions, bring it down and we can speak you via the steps. Much better still, bring it in and allow us look at it prior to you start any type of work
Over time, your Recreational vehicle's roofing can end up being used, harmed, or establish leakages, which can endanger its stability and lead to even more significant concerns. If you're experiencing any of these problems, it may be time to think about changing your RV roof covering.
There are a number of signs that show your motor home calls for a roofing system substitute. These indicators include water leakages, drooping or soft places on the roof, splits or divides in the roof covering product, too much deterioration, and visible sunlight coming with the roof covering. If you notice any of these indicators, it is essential to address them promptly to avoid further damages to your motor home.
On average, RV roof replacement prices can range from $2,000 to $10,000. When selecting a Motor home roofing system material, a number of factors come into play.
Rv Fiberglass Roof Repair Garden Grove, CA
Making a decision between a diy (DO IT YOURSELF) technique or specialist installment for your RV roofing replacement relies on your abilities, experience, and offered time. While do it yourself installation can save you cash, it calls for sufficient expertise and expertise to ensure a correct and leak-proof installment. On the various other hand, professional installment offers the benefit of expertise, experience, and guarantees.
Check and clean the seamless gutters and downspouts to ensure appropriate drainage and protect against water pooling on the roof covering. Apply a protective finish or sealant to the roofing system surface area as recommended by the producer. This can supply added UV defense and assistance prolong the life of the roof covering. Stay clear of strolling on the roofing system unless needed.
The expense of setting up a recreational vehicle roof can vary based on elements like RV size, chosen roofing material, and whether professional setup is asked for. Typically, you can anticipate to invest in between $2,000 and $10,000 for a motor home roof substitute. Yes, the roof covering of a RV can be replaced. If your RV's roof covering is damaged, used out, or leaking, a roofing system substitute is often necessary to make sure the architectural integrity of your motor home.
Fixing a split in a recreational vehicle roofing relies on the seriousness and kind of roofing material. For small rips, you can use roofing system repair work tape or sealer especially developed for motor home roof coverings. Bigger splits may require patching with a suitable roof material or looking for expert help. Motor home roof covering coatings can supply additional defense and expand the life expectancy of your roof covering.
Rv Slide Out Roof Repair Garden Grove, CA
Purchasing a high-grade RV roofing covering can be worth it for lasting roofing system maintenance. Flex Seal products are commonly used as short-term or quick-fix options for small leakages or fractures. While they may give a short-lived solution, it's recommended to consult with an expert and use appropriate RV roofing repair products for a more long-term and trustworthy repair.
PVC roofings supply superb durability, resistance to UV rays, and low upkeep needs. They are taken into consideration a reliable alternative for RV roofings, yet the best choice depends on your certain requirements and choices.
Resealing your RV roofing should be done on a regular basis to preserve its stability and prevent leakages. As a basic standard, it's recommended to reseal your motor home roof covering at the very least yearly or as per the maker's recommendations. Whether to leave your recreational vehicle slides in or out depends on the scenario and individual choice.
RV roof covering leakages are fairly common due to numerous elements such as age, wear and tear, inappropriate upkeep, or serious climate problems. The decision to total a Motor home due to water damages depends on the level of the damages and the insurance business's assessment.
Class C Rv Roof Repair Garden Grove, CA
Insurance insurance coverage for RV delamination relies on the details plan and the reason of delamination. It is necessary to evaluate your insurance plan and speak with your provider to comprehend the insurance coverage for delamination and any kind of applicable deductibles. Asserting water damage on a camper relies on your insurance policy and the situations surrounding the water damage.
It's recommended to seek professional help for this sort of repair service to guarantee proper architectural integrity and stop future concerns. Fiberglass motor home roofings use benefits such as durability, lightweight construction, and excellent insulation buildings. They are much less susceptible to cracking and can give better security versus severe weather compared to a few other roof covering products.
Tarping your RV roofing can give temporary protection versus leakages or more damages throughout extended periods of storage or when your motor home is not in use. Making sure the tarp is safely secured and correctly supported is critical to avoid water merging and roofing system damage. Yes, covering your RV while residing in it is feasible and can provide additional protection against the components.
Select a cover that matches your motor home's size and gives appropriate ventilation to avoid moisture build-up. Whether it's all right to depend on a motor home roofing system depends upon the manufacturer's guidelines and the sort of roof covering product. Specific RV roofings can handle limited weight, while others might require additional support or safety measures.
Rubber Roof For Camper Garden Grove, CA
Looking after your recreational vehicle roof is essential for preserving the overall problem and longevity of your rv. Normal assessments, timely repairs, and correct maintenance can assist protect against costly damages and prolong the life expectancy of your recreational vehicle roof covering. In this write-up, we went over the signs that indicate the requirement for a motor home roofing replacement, the typical kinds of recreational vehicle roofings offered, variables to take into consideration when selecting a roofing material, the ordinary cost of a RV roofing replacement, and the advantages and disadvantages of DIY versus expert installment.
If your RV is more than ten years old, after that it may be time to consider repairing or changing the roof covering. Older RV roofs have a tendency to end up being weak, split and leakage a lot more quickly, resulting in expensive fixings. You're going to additionally wish to take into consideration the product used to build your RV roofing system.
Rv Roof Repair Near Me Garden Grove, CA
The reality is that various kinds of roofing systems have different installation and fixing costs. When it involves changing a recreational vehicle roofing system, there are several various kinds of roofing systems to select from. One of the most usual sort of recreational vehicle roof is a rubber roof. Rubber roofings are long lasting, lightweight, and easy to install.
Another typical sort of roofing system is a steel roofing. Steel roofings are solid and durable, and they need marginal maintenance. They are additionally very lightweight and very easy to set up. Nonetheless, steel roofing systems are extra expensive than rubber roofs and need more specialized devices for installment. Fiberglass roof coverings are likewise preferred for recreational vehicle roofs.
Rubber Roof Installation Garden Grove, CA
They likewise cost much less than steel roofings. Fiberglass roofings are heavy and call for unique devices for installation. Lastly, there are acrylic roofings. Acrylic roofings are very lightweight, and they do not call for too much upkeep. They're low-cost yet are not as sturdy as rubber or steel roof coverings. Now that you understand the kind of RV roof you have, it's time to think about the expense to change it.
When it involves replacing a recreational vehicle roofing system, there are two alternatives: DIY or expert installment. If you select to do the work on your own, then you can conserve cash on labor costs. Nevertheless, it is very important to note that DIY installment is except every person. It calls for a specific level of ability and expertise, and it can also be taxing.
Rv Roof Leak Repair Garden Grove, CA
Specialist setup is also quicker than Do it yourself installation, so you can get back to enjoying your Motor home sooner. Professional installment can be a lot more costly than Do it yourself setup.
Hey there Folks, We remain in the middle of replacing the roofing system on our 2011 37' Carriage Cameo. Our company believe the damages was endured by the installer of the a/c systems, as it is a straight leak (up and down) with the EPDM, timber decking, and so on. We have obtained an initial price quote from the store of $12k for the roof covering replacement.
Rubber Roof For Camper Garden Grove, CA
Likewise, the estimate is initial as they have given this price quote without them seeing the gear in any way. Does 12k audio right to you men? I was assuming $5-7k perhaps, yet 12k? Wow - that just feels like a lots of dough. Ideas? ThanksTom.
The complexity of collaborating with fiberglass material adds to the raised expenses. Thermoplastic Olefin (TPO) is an energy-efficient and UV-resistant material generally made use of in motor home roofing systems. The substitute price for TPO roofing systems varies from $6,000 to $12,000. While much less usual, some Motor homes feature light weight aluminum roofs. Replacement prices for aluminum roofings vary from $6,000 to $10,000.
Rv Roof Repair Near Me Garden Grove, CA
Opting for Do it yourself setup might decrease labor expenses, however it calls for a specific ability level and time dedication - Garden Grove Rv Roof Repair Fiberglass. DIYers ought to be aware of product expenses and guarantee the application is done appropriately.

This removes the requirement for various items based upon your RV's roofing system material, streamlining the repair service process. SEMCO Fluid Membrane adapts to the motion of the motor home throughout traveling and modifications in temperature. This flexibility prevents breaking, an usual issue with rigid roofing materials. The versatility ensures a much longer life expectancy and less maintenance prices.
When it comes to changing a Motor home roof covering, there are two options: Do it yourself or specialist installment. It is crucial to keep in mind that DIY installation is not for everyone.
Specialist installment is additionally quicker than DIY installment, so you can obtain back to appreciating your RV faster. Expert installment can be a lot more costly than DIY installation.
Repair Rv Roof Garden Grove, CA
Hey there People, We remain in the middle of replacing the roofing system on our 2011 37' Carriage Cameo. We believe the damage was suffered by the installer of the air conditioner systems, as it is a direct leak (vertically) via the EPDM, timber outdoor decking, and so on. We have actually gotten an initial quote from the store of $12k for the roof covering replacement.
The estimate is initial as they have provided this price quote without them seeing the rig at all. I was believing $5-7k maybe, but 12k? Wow - that just seems like a lot of dough.
Thermoplastic Olefin (TPO) is an energy-efficient and UV-resistant material commonly used in Motor home roofs. While much less typical, some Motor homes feature aluminum roof coverings.
Class C Rv Roof Repair Garden Grove, CA
Choosing for Do it yourself installment could reduce labor costs, but it requires a certain ability degree and time dedication. DIYers need to be aware of material expenses and make sure the application is done appropriately.
OCRV Center
Address: 23281 La Palma Ave Yorba Linda, CA 92887Phone: (714) 909-1444
Email: art@ocrvcenter.com
OCRV Center
This gets rid of the requirement for various products based on your Motor home's roofing material, streamlining the repair work procedure. SEMCO Fluid Membrane adapts to the movement of the RV during travel and modifications in temperature level.
Rv Roof Maintenance Garden Grove, CARepair Rv Roof Garden Grove, CA
Replace Rv Roof Garden Grove, CA
Repair Rv Roof Garden Grove, CA
Rubber Roof For Camper Garden Grove, CA
Repair Rv Roof Garden Grove, CA
Rv Rubber Roof Replacement Garden Grove, CA
Repair Rv Roof Leak Garden Grove, CA
Rv Rubber Roof Replacement Cost Garden Grove, CA
Rubber Roof For Camper Garden Grove, CA
Rubber Roofing For Campers Garden Grove, CA
Rv Rubber Roof Repair Garden Grove, CA
Rubber Roof For Camper Garden Grove, CA
Rv Roof Repair Garden Grove, CA
Rubber Roofing For Campers Garden Grove, CA
Rv Roof Repair Garden Grove, CA
Rv Trailer Roof Repair Garden Grove, CA
Rubber Roofing For Rv Garden Grove, CA
Replace Rv Roof Garden Grove, CA
Repair Rv Roof Leak Garden Grove, CA
Rv Roof Repair Near Me Garden Grove, CA
Repair Rv Roof Garden Grove, CA
Motorhome Roof Replacement Garden Grove, CA
Resealing Rv Roof Garden Grove, CA
Rv Rubber Roof Replacement Garden Grove, CA
Rubber Roofing For Campers Garden Grove, CA
Rv Trailer Roof Repair Garden Grove, CA
Rv Fiberglass Roof Repair Garden Grove, CA
Rv Trailer Rubber Roof Repair Garden Grove, CA
Rv Roof Repair Near Me Garden Grove, CA
Rv Roof Repair Near Me Garden Grove, CA
Rv Roof Repair Near Me Garden Grove, CA
Replace Rv Roof Garden Grove, CA
Rv Roof Leak Repair Near Me Garden Grove, CA
Rv Rubber Roof Replacement Garden Grove, CA
Rubber Roofing For Campers Garden Grove, CA
Rv Slide Out Roof Repair Garden Grove, CA
Replace Rv Roof Garden Grove, CA
Replace Rv Roof Garden Grove, CA
Rv Roof Leak Repair Near Me Garden Grove, CA
Roof Repair For Rv Garden Grove, CA
Rv Trailer Roof Repair Garden Grove, CA
Rv Rubber Roof Replacement Cost Garden Grove, CA
Rv Roof Repair Garden Grove, CA
Rv Trailer Roof Repair Garden Grove, CA
Repair Rv Roof Garden Grove, CA
Rv Roof Repair Garden Grove, CA
Resealing Rv Roof Garden Grove, CA
Rv Slide Out Roof Repair Garden Grove, CA
Rubber Roofing For Rv Garden Grove, CA
Rv Trailer Roof Repair Garden Grove, CA
Rv Roof Repair Service Near Me Garden Grove, CA
Rubber Roof For Camper Garden Grove, CA
Rv Slide Out Roof Repair Garden Grove, CA
Rubber Roofing For Campers Garden Grove, CA
Rv Rubber Roof Replacement Garden Grove, CA
Rv Roof Repair Service Near Me Garden Grove, CA
Repair Rv Roof Leak Garden Grove, CA
Rv Rubber Roof Replacement Cost Garden Grove, CA
Rubber Roofing For Rv Garden Grove, CA
Rv Roof Repair Service Near Me Garden Grove, CA
Rubber Roof For Rv Garden Grove, CA
Rubber Roofing For Rv Garden Grove, CA
Rv Roof Replacement Garden Grove, CA
Rubber Roof Installation Garden Grove, CA
Epdm Rv Roof Repair Garden Grove, CA
Rubber Roof For Rv Garden Grove, CA
Rv Trailer Rubber Roof Repair Garden Grove, CA
Repair Rv Roof Leak Garden Grove, CA
Rv Roof Repair Service Near Me Garden Grove, CA
Rv Slide Out Roof Repair Garden Grove, CA
Rv Rubber Roof Repair Garden Grove, CA
Rv Fiberglass Roof Repair Garden Grove, CA
Rv Trailer Roof Repair Garden Grove, CA
Rv Roof Leak Repair Garden Grove, CA
Class C Rv Roof Repair Garden Grove, CA
Repair Rv Roof Leak Garden Grove, CA
Rubber Roofing For Rv Garden Grove, CA
Near Me Seo Firm Garden Grove, CA
Close By Seo Company Near Me Garden Grove, CA
OCRV Center
Table of Contents
- – Rv Trailer Rubber Roof Repair Garden Grove, CA
- – OCRV Center
- – Rv Trailer Rubber Roof Repair Garden Grove, CA
- – Rv Fiberglass Roof Repair Garden Grove, CA
- – Rv Slide Out Roof Repair Garden Grove, CA
- – Class C Rv Roof Repair Garden Grove, CA
- – Rubber Roof For Camper Garden Grove, CA
- – Rv Roof Repair Near Me Garden Grove, CA
- – Rubber Roof Installation Garden Grove, CA
- – Rv Roof Leak Repair Garden Grove, CA
- – Rubber Roof For Camper Garden Grove, CA
- – Rv Roof Repair Near Me Garden Grove, CA
- – Repair Rv Roof Garden Grove, CA
- – Class C Rv Roof Repair Garden Grove, CA
- – OCRV Center
Latest Posts
Laguna Beach Vision And Dental Insurance For Seniors
Medicare Insurance Agent Near Me San Clemente
Brea Planning Life Insurance
More
Latest Posts
Laguna Beach Vision And Dental Insurance For Seniors
Medicare Insurance Agent Near Me San Clemente
Brea Planning Life Insurance