All Categories
Featured
Table of Contents
- – Repair Rv Roof Leak Atwood, CA
- – OCRV Center
- – Rv Roof Repair Service Near Me Atwood, CA
- – Replace Rv Roof Atwood, CA
- – Motorhome Roof Replacement Atwood, CA
- – Rv Rubber Roof Maintenance Atwood, CA
- – Rv Roof Leak Repair Near Me Atwood, CA
- – Rubber Roof For Camper Atwood, CA
- – Rv Trailer Rubber Roof Repair Atwood, CA
- – Rv Fiberglass Roof Repair Atwood, CA
- – Rv Trailer Rubber Roof Repair Atwood, CA
- – Rv Roof Replacement Atwood, CA
- – Roof Repair For Rv Atwood, CA
- – OCRV Center
Repair Rv Roof Leak Atwood, CA
Apply sticky to the underside and press the spot strongly right into location. Seal the edges with lap sealant. Think about using a fluid roofing system finish: Conceal off locations not to be coated. Atwood Best Rv Roof Repair. Mix and put the layer evenly throughout the roof. Utilize a roller to spread it in an uniform layer.
Utilize a flashlight to evaluate the indoor ceiling. Particles accumulation can hold wetness and deteriorate products. Clean every 3-6 months, depending on use and storage space. Make use of a breathable recreational vehicle cover or Outrig indoor storage. Prevent auto parking under trees where limbs and sap can damage the roof covering. While numerous RV roofing system repair services can be DIY jobs, some situations call for professional help: Structural damage or significant roofing sagging Large, concealed leakages that are tough to map Complete membrane layer substitute Insurance-related repair services Learning how to carry out a motor home roof repair service equips you to secure your investment, save cash, and prevent mid-trip catastrophes.
Rv Roof Repair Service Near Me Atwood, CA
If you do not inspect, reseal, and repair your recreational vehicle roof covering routinely, you will wind up with some beautiful awful water damages. This is something that will quickly reduce the worth of your RV and can also make it pointless. Taking treatment of your Motor home roofing is something you can probably do all on your own.
After concerning 10 years, it will also be needed to reseal the whole roof. To do this, you'll require to climb up onto the roof covering, but be very cautious when you do. Are you sure it's solid sufficient to support you? Exists a ladder at the back? Otherwise, it more than likely isn't solid sufficient to be walked on.
Next, you'll intend to clean your roofing system extensively, so as to get rid of any type of dust fragments. You can utilize a long dealt with brush for this, yet never ever use a cleaner which contains oil solvents or citrus ingredients on your rubber or plastic roofing system. These types of cleaners will create irreversible damage to the surface area.
Replace Rv Roof Atwood, CA
While you're cleaning up, remove any kind of particles or old roofing material, yet take care while you do this as you could easily lengthen a tear, and even punch an opening via the roofing. You need to then dry the roof as best as you can. Note: Rubber recreational vehicle roofing systems can be extremely slippery when wet.
After the roofing system is tidy, you are mosting likely to intend to inspect the joints for holes, cracks or peeling, so you can reseal wherever necessary. You'll desire to make a point of resealing all joints as soon as a year whether or not they reveal indicators of wear.
When it comes to picking the finest Motor home roof sealer, you'll desire to take into consideration whether you are repairing a tear, resealing a seam, or securing the entire roofing. It can be made use of for area securing or to reseal every joint on the RV roof. Simply clean the location well and apply with a caulk weapon.
This keys and layers the roof to develop a lovely, safety layer that'll last for many years. There is the Dicor TPO Roofing System Coating System. Similar to the EPDM system provided above, this coating item will cover your TPO roof and help it last one more ten years. Prior To EPDM and TPO, metal was the product of option for motor home roofing systems.
The abovementioned EternaBond is still king when it comes to repairing tiny problems on a metal roofing. Recreational vehicle metal roofs do require to be absolutely resealed from time to time.
Motorhome Roof Replacement Atwood, CA
Dicor Self-Leveling Lap Sealer works well for this work. You'll require to remove the current roofing.
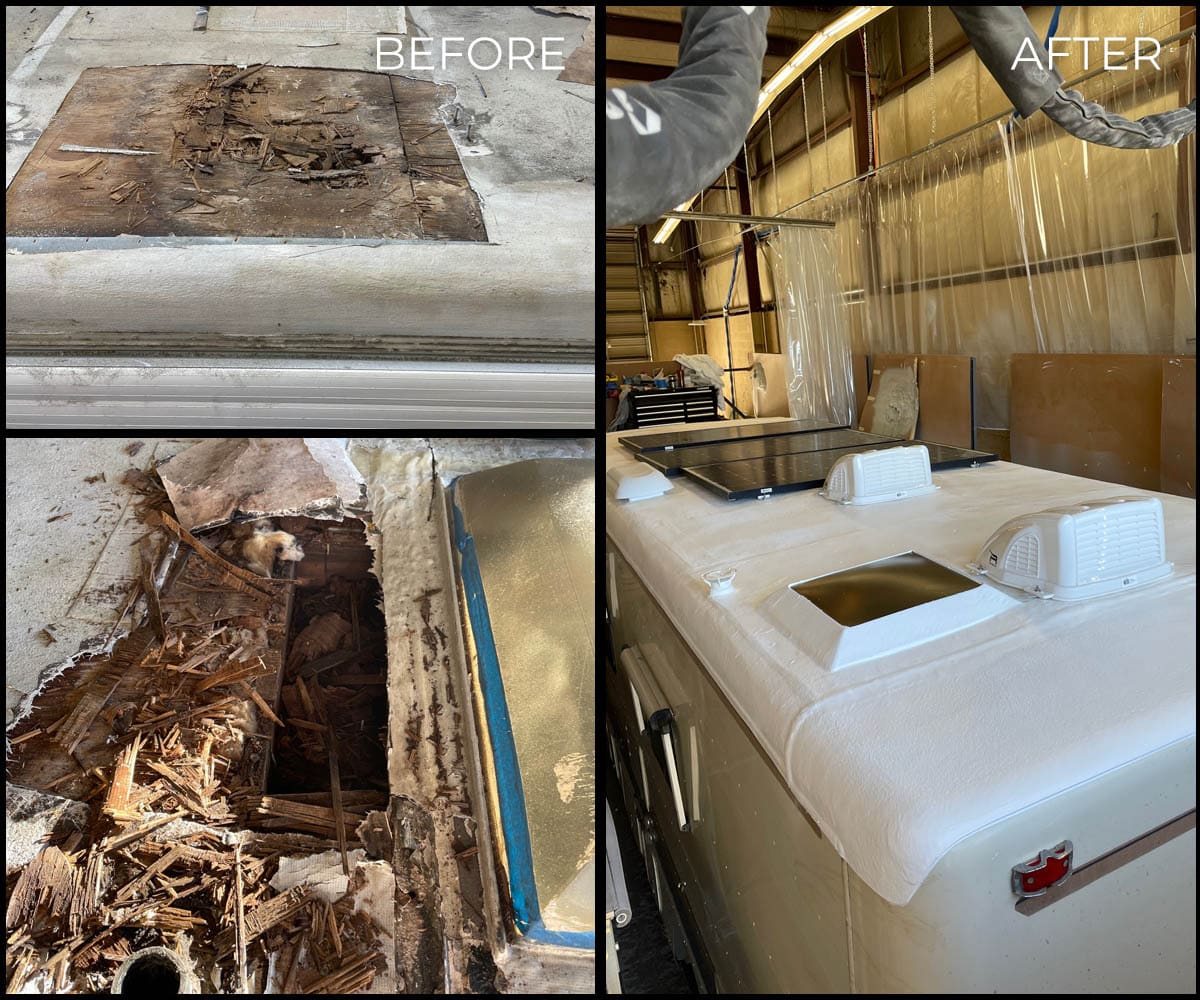
Check plywood for rot, bowing, mold, or splintering. Replace damaged items.
Do this in little pieces all along the roof covering, cutting holes in the rubber roofing for any feature that will certainly go back right into the roofing system. Change your roofing system's followers, skylights, and AC unit.
Rv Rubber Roof Maintenance Atwood, CA
In this post, we intend to show you exactly how to DIY motor home roofing repair. Living in a RV has impressive moments, yet things likewise fail. Knowing exactly how to DIY a lot of the points that can damage or screw up will certainly save you not just a whole lot of cash on motor home repairs however could also conserve you a lot of prospective time in the shop! This message might consist of affiliate links.
I may receive a small commission when you purchase using my link. Read our Disclaimer Plan for more details. We attempt to prepare our routes very carefully to avoid low-hanging items over the road. Often, however, we locate ourselves in unexpected circumstances. This is how we wound up with a couple of little splits on the roofing of our RV.
We thought we were clear of the branches, but we ended up catching a few of them on the much left side of the roofing system. There were an overall of 4-5 small openings in the side of the roofing system. At first, we really did not examine the roofing system since we really did not think we hit anything.
Rv Roof Leak Repair Near Me Atwood, CA
Among the tears in our recreational vehicle roofing A few weeks later on, we withstood an extreme electrical storm and a great deal of rainfall. Throughout the tornado, we located that we had a percentage of water leaking via one of the lighting fixtures in the bathroom. Thankfully, we did not end up with any permanent water damage.
He covered it as ideal he might with sturdy gorilla tape and afterwards bought the materials needed to do a motor home roof repair service. The EPDM rubber roof covering product that many RVs include is usually quite challenging regarding roof covering materials go. Rubber roofs last for years, but they do tear if caught hard enough.
Rubber Roof For Camper Atwood, CA
In our instance, this implied eliminating the gorilla tape that we had utilized as a momentary repair while we waited on the materials we ordered to show up. You'll want to clean the area around the tear that you will be covering well. This allows the patch to correctly stick and will stop future leaks.
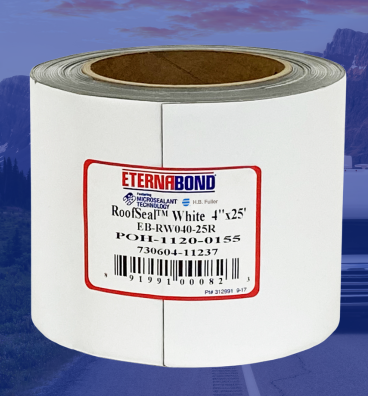
To cleanse the roofing, utilize massaging alcohol and either a dustcloth or paper towels., which is a RV roofing repair work tape.
You will intend to measure out how much you require and reduce a piece accordingly. Remove the backing and use meticulously over the tear in the roofing. Once it has touched the roofing, it adheres quite quickly, so you'll intend to see to it and placement it right the very first time.
Rv Trailer Rubber Roof Repair Atwood, CA
Press securely and continue to rub it and ravel the spot for several mins. Using a caulk weapon, layer the whole spot with Dicor 501LSW-1 Epdm Self-Leveling Lap Sealant. This rubber sealant produces a secure secondary seal on your rubber roof covering and guarantees that the leakage is properly secured.
There are a great deal of Dicor RV roof repair work items that you can buy including roof coatings, roofing sealer, and extra for the surface area of your roof. Applying the Dicor lap sealant Start on the sides and function your way around the whole spot, completing the center as you go.
Wipe any type of excess off and don't allow it to run down too far. This is a self-leveling sealer so you need to wind up with a rather level patch. According to the supplier, it will certainly be water resistant in 4 hours, 80% treated in 48 hours, and 100% treated in one month.
To change an entire Motor home roof covering with significant damages would result in much more pricey repair services. To prevent Recreational vehicle roof issues, examining your roof regularly throughout RV maintenance is a good idea.
Rv Fiberglass Roof Repair Atwood, CA
Your RV is a home on wheels, whether for numerous days each time or all year round. Like a home, the water systems can leak, such as the fresh water storage tank or the water heating system. A motor home is also more at risk to particular leaks, such as in the roofing system, because it is mobile and has a much more lightweight design than your home.
The most effective method for decreasing costs is recognizing typical leaks early and supplying an efficient solution. Your RV is a substantial investment. Examinations and repair services keep it in excellent problem so you can enjoy a lot more journeys on the road. Below are a couple of factors evaluations and repair services matter: When you inspect your recreational vehicle routinely, you can catch concerns like leakages before they cause substantial damage to your interior.
Rv Trailer Rubber Roof Repair Atwood, CA
Water leaking from the a/c unit outside the motor home is normal throughout procedure. The water ought to adhere to a details course down the networks on the roof that lead it to either the forward or aft edge of the gear. However, if you see water leaking inside or dripping in an additional location outside, that could signify a problem with the system.

Pipes leakages can show up in the storage area. Often, water damage presents evident indicators, however you may not notice it quickly in other situations.
Rv Roof Replacement Atwood, CA
They might also lower resale worth. Before you start the procedure of camper leakage repair service, you need to find the source. Adhere to these steps to recognize the leakage's origin factor: Inspect the roof, walls, ceilings and doors to locate any kind of areas with worn or fractured seals and caulking. Inspect the wall surfaces and floors for any type of soft places.
Run water via the faucets and inspect for leaking water at the links. Examine wastewater and freshwater systems for fractures or leakages in the containers, connections and pipes.
Roof Repair For Rv Atwood, CA
OCRV Center
Address: 23281 La Palma Ave Yorba Linda, CA 92887Phone: (714) 909-1444
Email: art@ocrvcenter.com
OCRV Center
Spray particular locations while somebody else stands inside the camper to see where water obtains in. A flashlight brightens the room for much more reliable assessment in cramped, dark areas like cupboards and plumbing fixtures. This device connects to tubes to look for uncommon stress drops that might suggest a leakage.
Rv Trailer Rubber Roof Repair Atwood, CABest Rv Roof Repair Atwood, CA
Rv Roof Leak Repair Near Me Atwood, CA
Rv Rubber Roof Maintenance Atwood, CA
Rv Rubber Roof Repair Atwood, CA
Rv Roof Leak Repair Near Me Atwood, CA
Rv Roof Leak Repair Near Me Atwood, CA
Rv Roof Repair Service Near Me Atwood, CA
Rv Roof Leak Repair Near Me Atwood, CA
Rv Roof Repair Near Me Atwood, CA
Epdm Rv Roof Repair Atwood, CA
Rv Trailer Rubber Roof Repair Atwood, CA
Rv Trailer Roof Repair Atwood, CA
Rv Roof Repair Near Me Atwood, CA
Repair Rv Roof Leak Atwood, CA
Repair Rv Roof Leak Atwood, CA
Rubber Roof For Rv Atwood, CA
Roof Repair For Rv Atwood, CA
Class C Rv Roof Repair Atwood, CA
Rv Roof Repair Service Near Me Atwood, CA
Rv Rubber Roof Repair Atwood, CA
Rubber Roof Installation Atwood, CA
Rv Slide Out Roof Repair Atwood, CA
Repair Rv Roof Leak Atwood, CA
Repair Rv Roof Leak Atwood, CA
Rv Roof Repair Atwood, CA
Rv Roof Repair Near Me Atwood, CA
Replace Rv Roof Atwood, CA
Rv Roof Repair Near Me Atwood, CA
Rv Rubber Roof Repair Atwood, CA
Rv Roof Replacement Atwood, CA
Repair Rv Roof Atwood, CA
Rv Rubber Roof Replacement Atwood, CA
Rubber Roof Installation Atwood, CA
Rv Roof Replacement Atwood, CA
Rv Roof Repair Fiberglass Atwood, CA
Motorhome Roof Replacement Atwood, CA
Replace Rv Roof Atwood, CA
Rv Roof Leak Repair Near Me Atwood, CA
Rv Trailer Roof Repair Atwood, CA
Rv Roof Repair Near Me Atwood, CA
Roof Repair For Rv Atwood, CA
Replace Rv Roof Atwood, CA
Rubber Roofing For Campers Atwood, CA
Resealing Rv Roof Atwood, CA
Rv Roof Maintenance Atwood, CA
Motorhome Roof Replacement Atwood, CA
Rv Roof Leak Repair Near Me Atwood, CA
Rv Slide Out Roof Repair Atwood, CA
Rv Roof Repair Atwood, CA
Rv Roof Repair Atwood, CA
Roof Repair For Rv Atwood, CA
Roof Repair For Rv Atwood, CA
Repair Rv Roof Atwood, CA
Rv Rubber Roof Repair Atwood, CA
Rv Roof Leak Repair Atwood, CA
Resealing Rv Roof Atwood, CA
Rv Rubber Roof Replacement Cost Atwood, CA
Rv Rubber Roof Replacement Atwood, CA
Rv Roof Leak Repair Near Me Atwood, CA
Rv Rubber Roof Maintenance Atwood, CA
Rubber Roof For Rv Atwood, CA
Rv Roof Repair Atwood, CA
Rv Roof Replacement Atwood, CA
Rv Roof Maintenance Atwood, CA
Rv Roof Leak Repair Near Me Atwood, CA
Rv Rubber Roof Replacement Atwood, CA
Replace Rv Roof Atwood, CA
Repair Rv Roof Leak Atwood, CA
Rv Roof Repair Atwood, CA
Rv Trailer Roof Repair Atwood, CA
Repair Rv Roof Leak Atwood, CA
Rv Rubber Roof Replacement Cost Atwood, CA
Rv Fiberglass Roof Repair Atwood, CA
Epdm Rv Roof Repair Atwood, CA
Resealing Rv Roof Atwood, CA
Rubber Roof For Rv Atwood, CA
Epdm Rv Roof Repair Atwood, CA
Finding A Good Local Seo Specialist Atwood, CA
Find A Seo Services For Small Business Atwood, CA
Best Rv Roof Repair Atwood, CA
OCRV Center
Table of Contents
- – Repair Rv Roof Leak Atwood, CA
- – OCRV Center
- – Rv Roof Repair Service Near Me Atwood, CA
- – Replace Rv Roof Atwood, CA
- – Motorhome Roof Replacement Atwood, CA
- – Rv Rubber Roof Maintenance Atwood, CA
- – Rv Roof Leak Repair Near Me Atwood, CA
- – Rubber Roof For Camper Atwood, CA
- – Rv Trailer Rubber Roof Repair Atwood, CA
- – Rv Fiberglass Roof Repair Atwood, CA
- – Rv Trailer Rubber Roof Repair Atwood, CA
- – Rv Roof Replacement Atwood, CA
- – Roof Repair For Rv Atwood, CA
- – OCRV Center
Latest Posts
Atwood Rv Service Repair Near Me
Brea Rv Rubber Roof Replacement Cost
Rv Collision Repair Shop Placentia
More
Latest Posts
Atwood Rv Service Repair Near Me
Brea Rv Rubber Roof Replacement Cost
Rv Collision Repair Shop Placentia