All Categories
Featured
Table of Contents
- – Rv Interior Furniture Ontario, CA
- – OCRV Center
- – Awnings For Trailers Ontario, CA
- – Awning Installation Ontario, CA
- – Rv Sofas Ontario, CA
- – Replacement Windows For Rv Ontario, CA
- – Rv Interior Furniture Ontario, CA
- – Awning Installation Ontario, CA
- – Rv Microwave Replacement Ontario, CA
- – Replacement Windows For Campers Ontario, CA
- – Rv Sofas Ontario, CA
- – Awning Installation Ontario, CA
- – Rv Dining Table Ontario, CA
- – OCRV Center
Rv Interior Furniture Ontario, CA
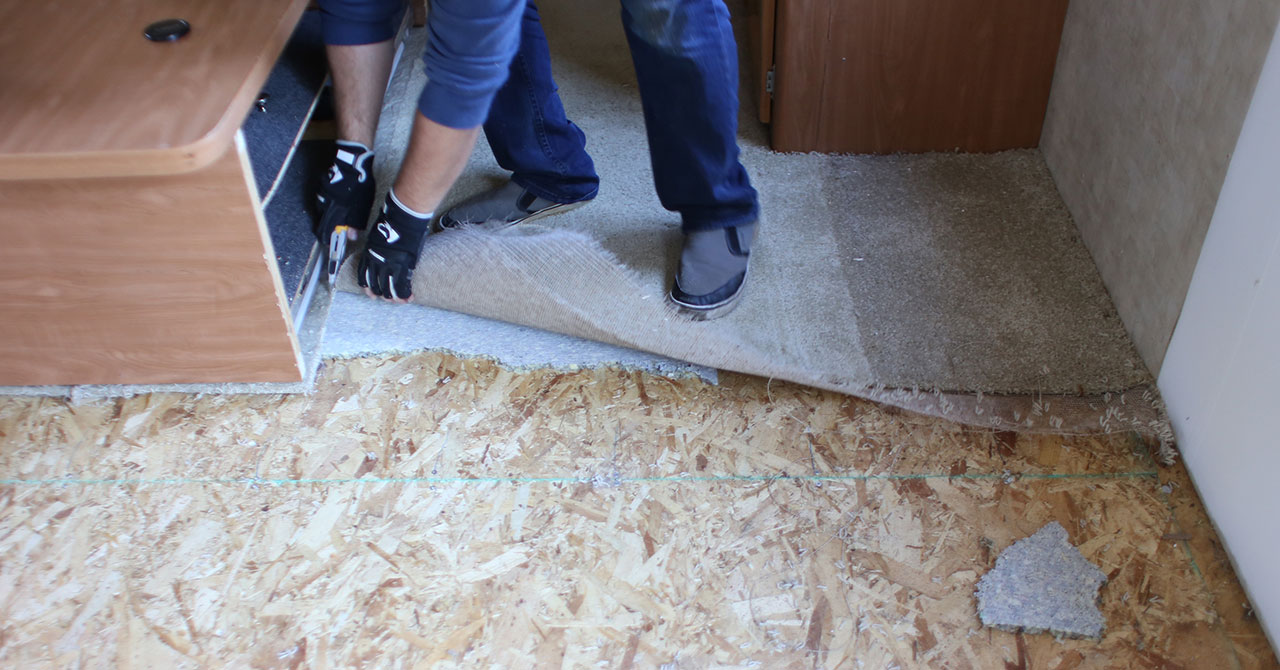
I'm gon na get all this linoleum out. I'm gon na obtain the plastic back past the edge of the door, and then really have a good look at just how things look.
So up right here in this edge it's punky. It's soft sufficient that I think with a hammer and a level bar, I can begin tearing some plywood out of there. And what that little bit exploratory surgery is gon na do is give me a feel for what the system resembles, which will after that tell me, you know, I think at some time right here, gon na finish up running a round saw, and reducing to great timber and afterwards replacing the bad stuff.
Awnings For Trailers Ontario, CA
So like I stated, I assume I can, I can peel sufficient of the bad stuff out of there to at the very least get a feel for what I have. Well, truthfully, where I'm at that quickly suffices to offer me an excellent feeling for finding out what I require to do next.
We can replace that as we obtain the brand-new floor in here too. What this will allow me do, seeing this, I assume what I can do next is get a circ saw reduced back here someplace, and after that peel back to that factor. We'll go from there and just maintain, like I claimed previously, taking a poor flooring out until we get to strong things.
Awning Installation Ontario, CA
Now it's feasible that this is gon na become kind of L-shape, due to the fact that in the center of the camper over right here, that flooring appears respectable, yet naturally that poor area is still there by the door, and this has to come out. So presently my program is cutting back to a joist here someplace to get to solid timber.
Now, the other point I wan na discuss is this. When I took that first piece of plywood out, I did that reducing and I got rid of the product, and I realized rather quick, I ought to've had a mask on.
Rv Sofas Ontario, CA
Among things I do desire to explain, I'm being really mindful working around the membrane that's under the flooring. And the factor is the membrane is in fact still intact, and I do not intend to suddenly obtain my foot in the wrong place and action through it or something and placed a large tear in it.
I'm truly carefully functioning around this by walking only on the joists, the sleepers, and after that likewise simply being really, really cautious concerning where I tip and where I put cameras and things. So right here's where I'm at. On this outside of the camper, among the important things that's truly good news is that the plates under of the walls are done in truly good shape, which honestly surprised me for the condition of everything else in below.
On this certain wall surface, the joist, the last rim item that's out right here outside of the camper is still there and it's in fine form. The trouble I'm up versus is that if I don't sister something alongside it below, when I come in with plywood, I will not have anything to nail the plywood to.
Replacement Windows For Rv Ontario, CA
Simple things. I suggest, all I'm doing is getting it in place, and then I'm opting for screws for every little thing as opposed to nails just to make certain I get a good bite, and it remains stuck once it remains in there. And even more of the same. I'm just going to drive screw after screw after screw to protect these components together and make certain they remain stuck.

I'm obtaining that edge item in. And among things to be cognizant of is that as a result of the skin on the outside of the trailer, I can't obtain bolts through this, the board we just placed in and tie it right into that. So instead I am making use of angle irons below.
Talk much more about that. One of the things, one of the things also, that I wanted to mention is that I did a switch, a screw button, after I got started on that initial piece, I was including back in. I recognized that those screws I was making use of were nowhere near husky enough of what we were asking of them.
Rv Interior Furniture Ontario, CA
Currently with these, what that angle iron will certainly do is connect these 2 assemble. And afterwards the other thing to remember below is that once the deck begins, once plywood comes on, which overlays these pieces and all, and obtains attached to them, that also is mosting likely to aid bridge every little thing to make sure that it connects these components with each other.
The angle iron plus the plywood is gon na help with that. That's why I keep my hearing security in, even when all I'm doing is driving screws. And in a constrained atmosphere like this, you recognize, once more, we want to be safety and security mindful throughout this.
And the factor for that is I utilized a jigsaw, handheld jigsaw, and I reduced them back and they're not always reduce back yet to the factor where I go to great timber, and I'm gon na tie into them. We'll enter into that yet. What I desired to do was cut back where I recognized the ends were negative, and I required to provide some clearance to make it easy to get that edge piece in.
Awning Installation Ontario, CA
The following step is going to be start bringing those sleepers, the floor joists back in, and then from there insulation and plywood. Extra floor, floor, floorings are us.
And I possess a staple gun and I can staple it, yet I seemed like I desire something on that particular that I understand is gon na be a bit a lot more robust connection is, is definitely gon na maintain that material tight. So here's my plan keeping that. I have actually got a table saw in the structure, and we'll chat much more regarding devices here in just a second.
And I believe it's actually vital that this is treated since it's mosting likely to live outside under the camper, not inside the camper. Using the table saw I tore that right into half inch thick strips. These are one and a fifty percent by half. And of training course the sleepers, the joists are on side.
Utilizing a counter sink in my drill, I have actually already pre-drilled these, and I did that so that when I start driving screws, I do not take a possibility of splitting these. I'm pretty close to the following step, which is crawl beneath there, and drive screws via the pre-drilled holes.
Rv Microwave Replacement Ontario, CA
We're obtaining ready up here. So the screws should likewise be outside to make certain that they're gon na not corrosion away on you. As soon as you've got these prepared now, like I claimed, we can get underneath there, and be some complicated video camera job to get this for you, yet we'll obtain these fastened up in position to the bottom of the sleepers.
And after that naturally, an option of hand devices, circ saw, belt sander, jigsaw, saws all. And with the bigger tools, with the miter saw and the table saw, that was essential, because as I began to produce those new joists that I was switching in, I didn't wish to need to constantly run to a few other shop and cut parts, come back, cut components, return.
Following, um, allow's crawl under a camper. Well, I'm under the camper currently, clearly, and you can see over there, I've already obtained a couple of battens in position and one more one right here. What I'm doing is feeling through the fabric, and after that there's a joist right there.
And then, brr, brr, must be able to simply drive some screws. The batten is just acting like an actually big washer to make sure that that fabric doesn't have the chance to tear through and come loose.
Replacement Windows For Campers Ontario, CA
So the next thing inside below is to look for a factor where we reach good material, and after that link into that with a new item in a manner that structurally is gon na job. And also simply is easy sufficient to do. Let me get some tools pulled together, and then we'll look at out with the old and in with the brand-new below.
I've obtained a bad end, easily recognized, because that wood was in actually, actually poor shape. I'm looking for a part right here where it gets sound.
Rv Sofas Ontario, CA
If I had to return further with the system I'm concerning to make use of below, I would be fine keeping that. Rv Chairs Ontario. If in order to eliminate poor material, I had to cut back below where I'm not over a steel frame component, I would certainly do that. What I've done so far lies the steel
And the next thing, let's get that poor spot removed. Jigsaw is a great tool for that. And what I intend to do as I reduce is also lift a little. I wan na see to it the jigsaw blade does not pass through the membrane layer down right here. That went well. And I have actually already obtained a brand-new item cut.
There we go. And here's the point. The key to this are pieces of scrap plywood. And the means this is gon na job is we're gon na bridge that seam with those plywood scraps. Plywood is exceptionally strong stuff. And paired with the plywood, we're going to add glue and screws, which is truly gon na make this basically similar to having one lengthy piece once again when we're done.
I have got in my warm little hands, an additional item to go on that side. I simply have to obtain my system out of the means below.
Awning Installation Ontario, CA
And when this is done, that is gon na be a really, truly solid system. Below's a huge moment. The last piece of plywood is concerning to obtain placed in, but allowed's talk concerning a couple points. Notification the insulation in the floor. I have actually insulated the flooring with what's called mineral wool or rock woollen insulation.
So this is a great application for it. Because of utilizing that, that's part of the factor that I wished to make certain those battens obtained under the material. And the factor being that that mineral wool, it's got some density to it. Currently it's not that sitting there, I'm stressed regarding it collapsing, particularly with the battens that I place below, however simply be mindful that if you make use of that it does have some weight to it, and you wan na make certain that that textile under the camper is gon na support that.
So when I'm reducing this piece, the item that's gon na complete below, I wish to keep the factory side on that end butting against the factory side that's already in location, and after that the cut edge goes out below up against the wall. Currently, if you need to do a trim, you need to do a trim, and in this case I did.
If you got ta do it, you got ta do it, yet it in the excellent world, manufacturing facility side to manufacturing facility edge below on the long joints, and on the short joints where pieces are satisfying. The various other point is that we want to be half on a joist. So what I indicate by that is that this piece of plywood is half on this joist, and after that the following piece of plywood is gon na come on here, so it's got something to be fastened to, which's just a, you know, a building and construction guideline that you constantly comply with when you're doing floor covering or roofing.
Rv Dining Table Ontario, CA
There aren't any kind of chunks of insulation laying on top of the framing. I have actually obtained, if you look out right here, I have actually got these locations noted on the wall, to make sure that as I occur with a screw gun, more on that particular in a second, I recognize that sleeper, that joist exists, center is there, facility exists.

I ought to have an inch and a quarter staple going right into it. I do not have a stapler that'll do that, but I do have a screw weapon that I can use to drive long screws. I'm doing this with a screw weapon instead of a stapler. All right, a great deal of talking, and allow's check out getting the plywood ahead in.
Well, we ended with a lot of screwing around.The entire floor was a great deal of screwing about. Just a great deal of little picky things to do to obtain this right, but definitely worth doing, because clearly there were some negative spots in right here that needed to go. With those screws, if there's any place where you seem like you could've missed, obtain a common cordless screwdriver, back those screws out.
Rv Couch Bed Ontario, CARv Refrigerator Replacement Ontario, CA
Awnings For Trailers Ontario, CA
Rv Couch Bed Ontario, CA
Rv Dining Table Ontario, CA
Rv Upholstery Ontario, CA
Rv Sofas Ontario, CA
Rv Couch Ontario, CA
Rv Carpet Installation Ontario, CA
Remodeling Rv Ontario, CA
Rv Replacement Awnings Ontario, CA
Motorhome Carpets Ontario, CA
Rv Refrigerator Replacement Ontario, CA
Motorhome Carpets Ontario, CA
Rv Couch Ontario, CA
Rv Upholstery Ontario, CA
Awnings For Rv Ontario, CA
Remodeling Rv Ontario, CA
Motorhome Carpets Ontario, CA
Remodeling Rv Ontario, CA
Replace Rv Flooring Ontario, CA
Rv Carpet Installation Ontario, CA
Rv Couch Ontario, CA
Rv Carpet Installation Ontario, CA
Rv Upholstery Ontario, CA
Rv Dinette Booth Ontario, CA
Awnings For Rv Ontario, CA
Replacement Windows For Rv Ontario, CA
Rv Couch Ontario, CA
Rv Carpet Replacement Ontario, CA
Awnings For Trailers Ontario, CA
Rv Dinette Table Ontario, CA
Rv Couch Bed Ontario, CA
Rv Sofa Sleeper Ontario, CA
Rv Couch Bed Ontario, CA
Rv Couch Ontario, CA
Rv Sofa Beds Ontario, CA
Replacement Windows For Campers Ontario, CA
Replacement Windows For Rv Ontario, CA
Rv Refrigerator Replacement Ontario, CA
Rv Sofa Sleeper Ontario, CA
Rv Chairs Ontario, CA
Rv Dining Table Ontario, CA
Awning Installation Ontario, CA
Rv Interior Furniture Ontario, CA
Rv Dinette Booth Ontario, CA
Rv Interior Furniture Ontario, CA
Rv Interior Furniture Ontario, CA
Rv Couch Ontario, CA
Rv Carpet Installation Ontario, CA
Rv Microwave Replacement Ontario, CA
Replacement Rv Refrigerator Ontario, CA
Rv Sofa Sleeper Ontario, CA
Rv Sofas Ontario, CA
Rv Interior Furniture Ontario, CA
Rv Replacement Awnings Ontario, CA
Rv Sofas Ontario, CA
Rv Carpet Replacement Ontario, CA
Replacement Rv Refrigerator Ontario, CA
Rv Interior Furniture Ontario, CA
Replacement Windows For Rv Ontario, CA
Rv Replacement Awnings Ontario, CA
Rv Dinette Booth Ontario, CA
Rv Chairs Ontario, CA
Rv Sofa Beds Ontario, CA
Awning Installation Ontario, CA
Replacement Windows For Campers Ontario, CA
Rv Sofas Ontario, CA
Rv Upholstery Ontario, CA
Rv Carpet Installation Ontario, CA
Awning Installation Ontario, CA
Rv Sofa Sleeper Ontario, CA
Replace Rv Flooring Ontario, CA
Replacement Rv Refrigerator Ontario, CA
Motorhome Carpets Ontario, CA
Rv Carpet Installation Ontario, CA
Rv Couch Bed Ontario, CA
Rv Sofa Sleeper Ontario, CA
Near You Seo Management Ontario, CA
Find Seo Companies Ontario, CA
OCRV Center
Table of Contents
- – Rv Interior Furniture Ontario, CA
- – OCRV Center
- – Awnings For Trailers Ontario, CA
- – Awning Installation Ontario, CA
- – Rv Sofas Ontario, CA
- – Replacement Windows For Rv Ontario, CA
- – Rv Interior Furniture Ontario, CA
- – Awning Installation Ontario, CA
- – Rv Microwave Replacement Ontario, CA
- – Replacement Windows For Campers Ontario, CA
- – Rv Sofas Ontario, CA
- – Awning Installation Ontario, CA
- – Rv Dining Table Ontario, CA
- – OCRV Center
Latest Posts
Vision Insurance For Seniors Laguna Beach
Aliso Viejo Dental And Vision Insurance For Seniors
Kitchen Hood Inspection Sunland
More
Latest Posts
Vision Insurance For Seniors Laguna Beach
Aliso Viejo Dental And Vision Insurance For Seniors
Kitchen Hood Inspection Sunland